
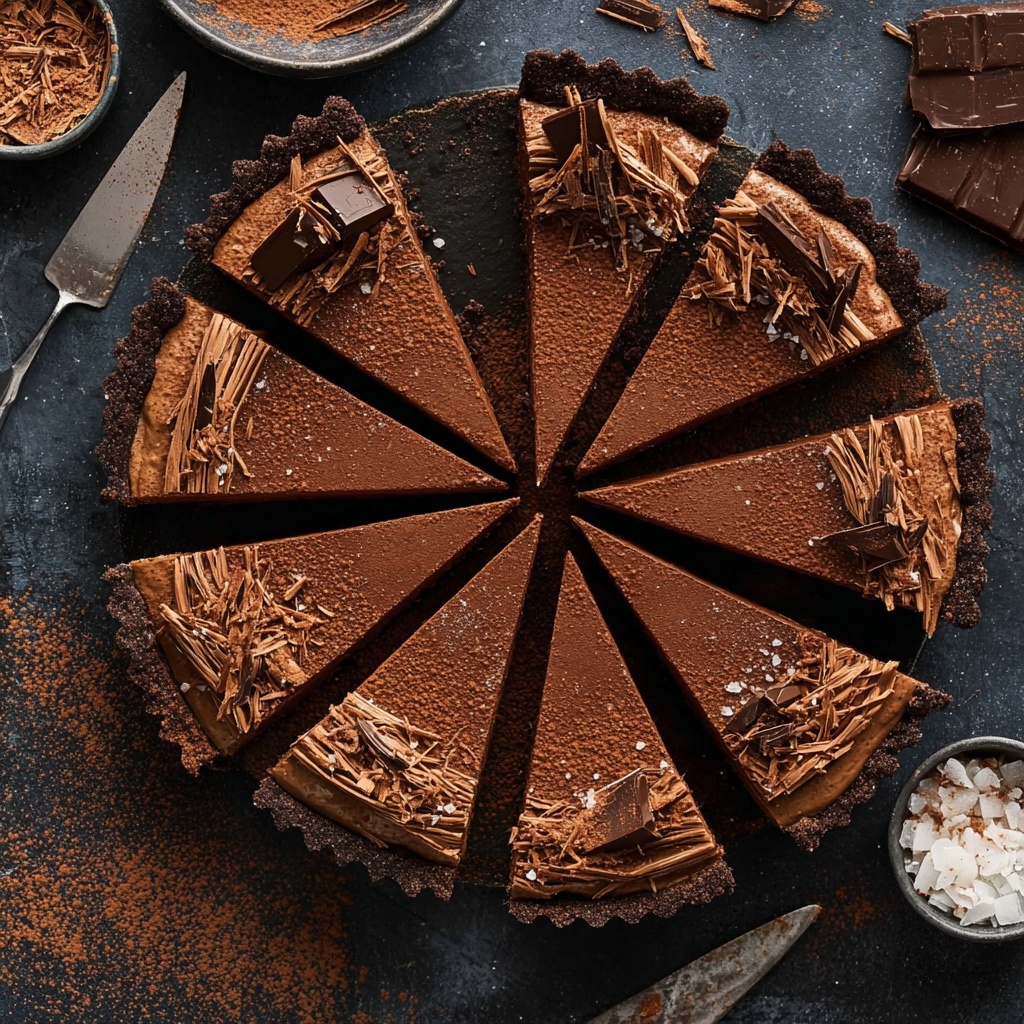
There is something irresistibly decadent about this Vegan Chocolate Tart (Nut-Free) Recipe that makes it a true showstopper, even without any dairy or nuts involved. It delivers the perfect richness and silky smooth texture that chocolate lovers crave, wrapped up in a crisp cocoa crust that complements the luscious ganache filling beautifully. Whether you are vegan, allergic to nuts, or simply looking for a crowd-pleasing dessert, this tart is an absolute delight that’s surprisingly easy to pull off. Get ready to fall in love with the harmonious blend of deep chocolate flavor, a hint of coffee, and just the right touch of sweetness all in one elegant tart.
Ingredients You’ll Need
These ingredients are straightforward yet essential, ensuring every element of the Vegan Chocolate Tart (Nut-Free) Recipe works together to create a perfect bite. Each one brings its own magic—whether it’s the rich cocoa providing deep chocolate flavor, vegan butter creating that buttery crumbly crust, or the creamy coconut milk adding a luscious filling texture.
- 120 g plain flour: The base for the crisp, tender tart crust that holds everything together.
- 30 g Dutch processed cocoa powder: Adds rich color and intense chocolate flavor to the crust.
- 30 g soft brown sugar: Brings balanced sweetness and moisture to the crust.
- 80 g vegan butter (nut-free): Gives the crust a flaky, buttery texture essential for a great tart base.
- ¼ teaspoon sea salt: Enhances flavors and cuts through the sweetness.
- 250 g full fat chilled canned coconut milk: Creates a creamy, dairy-free ganache that is luxuriously smooth.
- 1 teaspoon instant coffee granules or espresso powder: Amplifies the chocolate depth without a strong coffee taste.
- 220 g vegan dark chocolate: The star ingredient for the silky filling rich with chocolate goodness.
- 2 tablespoons pure maple syrup: Adds natural sweetness and a subtle hint of flavor complexity.
- 2 teaspoons vanilla extract: Rounds out the flavor with a warm, comforting note.
- 60 g vegan butter (nut-free), cut into chunks: Makes the ganache extra glossy and smooth.
- 120 g vegan dark chocolate: For garnishing, to add texture and visual appeal (optional).
- Gold leaf sheets (optional): Adds a luxurious finishing touch if you want to treat your guests.
How to Make Vegan Chocolate Tart (Nut-Free) Recipe
Step 1: Prepare the Crust
Start by heating up your oven to 175°C (350°F), a perfect moderate temperature. Lightly grease a 9-inch tart tin with oil or vegan butter and line the base with parchment paper to ensure easy removal. Next, combine the plain flour, cocoa powder, brown sugar, vegan butter, and sea salt in a food processor. Blitz everything together until the mixture clings together like dough—if it’s too crumbly, just add a tablespoon of water to coax it into shape.
Step 2: Bake the Crust
Firmly press the dough into the base and sides of your tart tin, then prick some holes into the base with a fork. This prevents bubbling and helps it bake evenly. Pop your crust into the oven and bake it for about 15 minutes, until it turns slightly golden and smells delicious. Once done, let it cool right in the tin; don’t remove it yet as this keeps the shape intact for the filling.
Step 3: Make the Chocolate Ganache Filling
While the crust cools, bring the coconut milk and instant coffee granules or espresso powder to a gentle simmer in a saucepan—be careful not to boil it or you’ll risk curdling. Meanwhile, finely chop the dark chocolate and place it in a heatproof bowl. Pour the hot coconut milk mixture over the chocolate and let it sit for about 5 minutes without stirring, giving it time to melt and soften.
Step 4: Combine and Finish the Ganache
After the chocolate has melted, whisk the mixture until it is completely smooth. Stir in the maple syrup, vanilla extract, and a pinch of sea salt for that perfect balance. Finally, add the chunks of vegan butter and keep stirring until the ganache is glossy and luscious with no lumps. This step makes your filling rich and velvety.
Step 5: Set the Tart
Pour the silky chocolate ganache into your pre-baked tart crust. Gently tap the tart tin on your work surface to release any trapped air bubbles, ensuring an even surface. Let it cool on the counter for about 10 minutes before transferring to the fridge to chill and set completely — at least 4 hours or, better yet, overnight.
How to Serve Vegan Chocolate Tart (Nut-Free) Recipe

Garnishes
This tart is a canvas for your creativity! Choose to grate some extra vegan dark chocolate over the top, melt it into a drizzle, or scatter chunks for some textural contrast. Like to feel fancy? Add a sprinkle of sea salt flakes and adorn with delicate gold leaf sheets for an elegant flair.
Side Dishes
Pair this chocolate tart with rich vegan ice cream or fresh seasonal berries to brighten each bite. A dollop of coconut whipped cream adds even more indulgence while balancing the intense chocolate flavor. For a refreshing contrast, a citrusy fruit salad or a vibrant berry coulis works wonderfully alongside.
Creative Ways to Present
Think beyond a standard slice: serve individual mini tarts for parties, or cut the tart into squares and arrange them on a dessert platter with edible flowers for an impressive display. For an interactive dessert, offer toppings like vegan caramel sauce, crushed vegan cookies, or chopped fresh mint leaves so everyone can customize their own slice.
Make Ahead and Storage
Storing Leftovers
This Vegan Chocolate Tart (Nut-Free) Recipe keeps beautifully in the fridge. Store leftovers in an airtight container or tightly wrapped in cling film on a plate, and it will stay perfectly fresh for up to 5 days. The flavors actually deepen, making it taste even better the next day.
Freezing
If you want to prep in advance or save some for later, this tart freezes well. Wrap it securely in plastic wrap and place it in a freezer-friendly container. It can be frozen for 4 to 6 weeks without losing its luscious texture or flavor.
Reheating
To enjoy after freezing, simply defrost the tart in the fridge for 1 to 2 hours. Serve chilled or allow it to come to room temperature if you prefer the ganache a little softer. Avoid microwaving to keep the texture smooth and glossy.
FAQs
Can I use other plant-based milks instead of coconut milk?
This recipe works best with full-fat canned coconut milk because it provides the rich creaminess needed for that velvety ganache. Other plant-based milks tend to be too watery and won’t set properly.
Is it possible to make this tart gluten-free?
Yes, you can substitute the plain flour with a gluten-free flour blend that works well for baking. Just ensure it contains xanthan gum or similar binding agents for the crust to hold together nicely.
Can I replace the vegan butter with coconut oil?
You can, but keep in mind coconut oil has a different melting point and flavor. It may create a slightly softer crust and add a subtle coconut aroma, which can be delicious but different from the classic buttery texture.
How do I know when the ganache is fully set?
The ganache should be firm to the touch and hold its shape when you lift the tart from the tin. This usually takes 4 hours in the fridge but overnight chilling is ideal for the best texture and flavor.
What if I don’t have instant coffee or espresso powder?
If you’re not a coffee fan or don’t have these on hand, you can omit them entirely. They just enhance the depth of the chocolate flavor without making it taste like coffee.
Final Thoughts
Making this Vegan Chocolate Tart (Nut-Free) Recipe is one of those joyful kitchen adventures that results in a luxurious, crowd-pleasing dessert everyone can enjoy. Its rich chocolate layers, velvety ganache, and crunchy crust come together in a way that feels so indulgent yet surprisingly simple. I truly hope you give it a try and share the magic it brings to your table — because who doesn’t deserve a slice of pure chocolate happiness?
Print
Vegan Chocolate Tart (Nut-Free) Recipe
- Prep Time: 25 minutes
- Cook Time: 15 minutes
- Total Time: 4 hours 40 minutes
- Yield: 12 servings
- Category: Dessert
- Method: Baking
- Cuisine: Vegan
- Diet: Vegan
Description
This Vegan Chocolate Tart is a rich, nut-free dessert featuring a crisp cocoa-infused crust and a luscious coconut milk-based chocolate ganache filling. It’s an indulgent, dairy-free treat perfect for vegans and those with nut allergies, with a smooth, velvety texture and a deep chocolate flavor enhanced by coffee and maple syrup.
Ingredients
Crust
- 120 g plain flour
- 30 g Dutch processed cocoa powder (or unsweetened cocoa powder)
- 30 g soft brown sugar (or light muscovado/coconut sugar)
- 80 g vegan butter (nut-free brand if required)
- ¼ teaspoon sea salt
Filling
- 250 g full fat chilled canned coconut milk
- 1 teaspoon instant coffee granules or espresso powder (or 1 tbsp for a stronger flavor)
- 220 g vegan dark chocolate (or 240 g vegan milk chocolate)
- 2 tablespoons pure maple syrup
- 2 teaspoons vanilla extract
- 60 g vegan butter (cut into chunks, nut-free brand if required)
Garnish
- 120 g vegan dark chocolate (for grating, melting, or chunks)
- Sea salt (to sprinkle)
- Gold leaf sheets (optional)
Instructions
- Prepare the Crust: Preheat your oven to 175°C (350°F). Lightly grease a 9-inch tart tin with oil or vegan butter, then line the base with parchment paper. Place all crust ingredients into a food processor and blend until a sticky dough forms, adding a tablespoon of water if necessary to help binding. Press the dough evenly into the base and sides of the tart tin, then use a fork to prick holes across the base.
- Bake the Crust: Bake the crust in the preheated oven for 15 minutes until it is slightly browned. Remove from the oven and allow it to cool completely, leaving it in the tin.
- Make the Filling: In a saucepan, combine the chilled coconut milk and instant coffee granules or espresso powder, and gently bring to a simmer; do not let it boil. Meanwhile, finely chop the chocolate and place it in a heat-proof bowl.
- Combine Chocolate and Coconut Mixture: Pour the hot coconut milk mixture over the chopped chocolate and let it sit for 5 minutes to melt. Whisk the mixture until smooth and silky. Stir in the maple syrup, vanilla extract, and sea salt until well combined. Add the chunks of vegan butter and mix until the butter has melted and the ganache is glossy.
- Set the Tart: Pour the ganache into the cooled tart crust. Gently tap the tart tin on the counter to remove any air bubbles. Let it cool for around 10 minutes, then transfer to the refrigerator to set for at least 4 hours or overnight for best results.
- Garnish and Serve: Once set, carefully remove the tart from the tin and place it on a serving plate. Garnish with grated, melted, or chunked vegan dark chocolate as desired, sprinkle some sea salt on top, and optionally adorn with gold leaf sheets for an elegant touch.
- Storage: Store the tart in an airtight container or covered with cling film in the refrigerator for up to 5 days. It can also be frozen for 4-6 weeks; defrost in the refrigerator for 1-2 hours before serving.
Notes
- Use full-fat coconut milk that has been chilled to achieve a thick, creamy ganache.
- For a more intense coffee flavor, increase instant coffee from 1 teaspoon to 1 tablespoon.
- Opt for vegan dark chocolate for a richer taste; vegan milk chocolate may produce a sweeter, softer ganache.
- Ensure vegan butter used is nut-free if allergies are a concern.
- Do not boil the coconut milk mixture to prevent separation.
- Allow the tart to set thoroughly in the fridge to ensure a firm texture.


