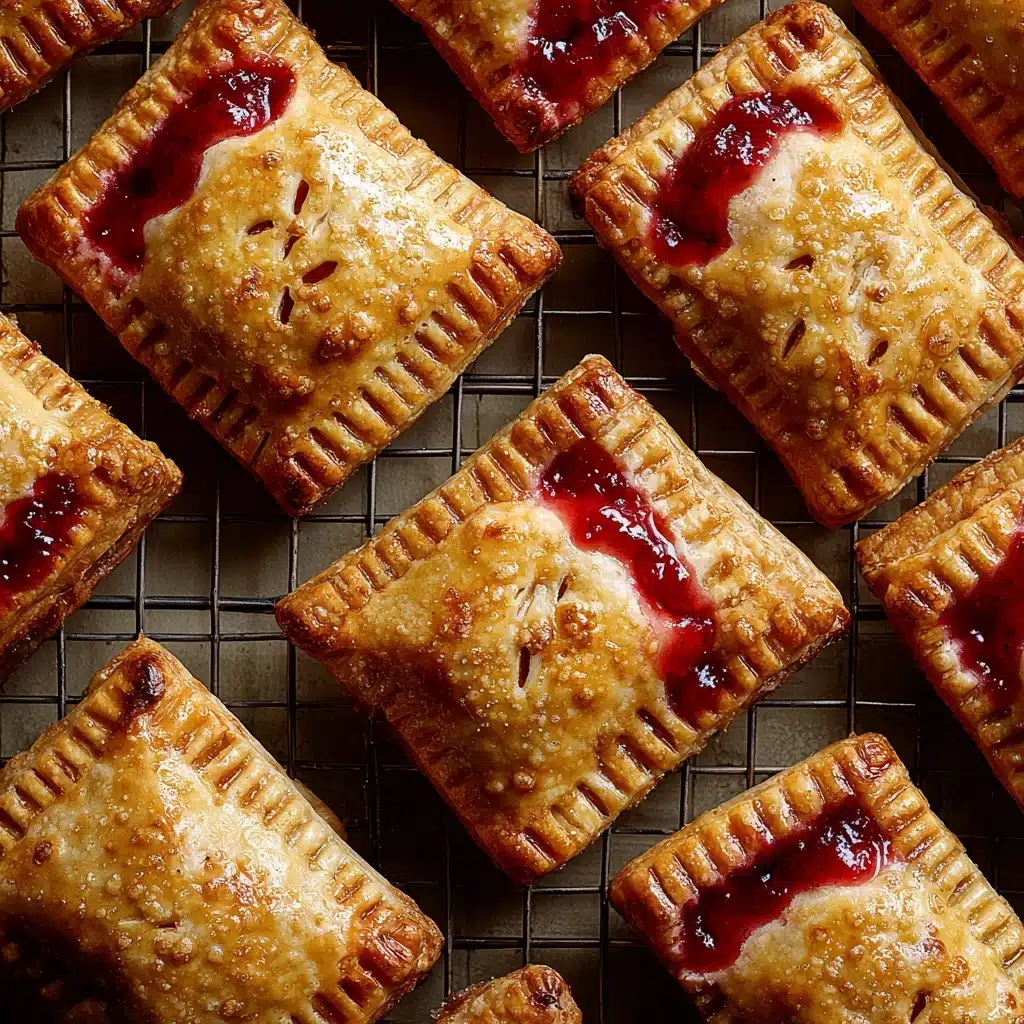
Sweet, portable, and bursting with vibrant fruit flavor, Cherry Hand Pies are the kind of treat that brighten up any table and bring a little magic to snack time. With their flaky golden crust and juicy cherry center, these hand pies are as fun to make as they are to eat. Perfect for picnics, bake sales, or just a cozy evening at home, this is a delightful dessert that feels both nostalgic and impressive. If you’re looking for an easy, crowd-pleasing bake, let me show you why these Cherry Hand Pies will win your heart (and taste buds) every single time.
Ingredients You’ll Need
Ingredients You’ll Need
The beauty of Cherry Hand Pies is how a handful of well-chosen ingredients transforms into a dessert that tastes like it took all day. Each ingredient stands out in flavor, texture, or color, making these pies so much more than the sum of their parts.
- Cherries: Fresh or frozen, pitted and halved—these beauties bring all the tart juiciness that makes the filling shine.
- Granulated Sugar: Sweetens up the cherries just enough while still letting their natural tang peek through.
- Cornstarch: Helps to thicken the cherry filling, so you don’t end up with a runny mess.
- Lemon Juice: A splash of acidity brightens and elevates the cherry flavor beautifully.
- Almond Extract: Just a half teaspoon adds an irresistible, subtle nutty aroma that pairs dreamily with cherries.
- Refrigerated Pie Crusts: Store-bought crusts keep things easy, flaky, and foolproof—no need to stress about dough from scratch.
- Egg: Beaten for an egg wash, lending a shiny, golden finish to your pies.
- Milk: Mixed with the egg wash for a tender glaze on the crust.
- Coarse Sugar (optional): Adds a bit of sparkle and a sweet crunch to each bite—totally optional but highly recommended!
How to Make Cherry Hand Pies
Step 1: Prepare Your Cherry Filling
Start by tossing your cherries, sugar, cornstarch, lemon juice, and almond extract into a small saucepan. Over medium heat, let those flavors mingle and simmer, stirring occasionally. It usually takes about five to seven minutes for the mixture to bubble and thicken nicely—just watch for that luscious glossy look. Once the filling is ready, remove it from the heat and let it cool completely. This step is key to making sure the filling stays in place when you assemble your Cherry Hand Pies.
Step 2: Roll and Cut the Pie Crusts
Lightly flour your surface for easy handling, then unroll your pie crusts. Using a 4-inch round cutter, cut out as many circles as you can—these will form the pillowy parcels for your cherry filling. Don’t toss those scraps! You can reroll the leftovers to make extra pies if you’d like.
Step 3: Assemble the Hand Pies
Lay out half of your pastry circles on a parchment-lined baking sheet, spacing them evenly. Spoon about one to one and a half tablespoons of cooled cherry filling right into the center of each. With a pastry brush, dab a ring of beaten egg around the edges of the circles—this helps “glue” the top and bottom crust together, keeping every bite neatly sealed.
Step 4: Close and Seal
Top each filled circle with another dough round. Gently press around the edges, then use a fork to crimp and seal all the way around. This not only looks adorable but also ensures your luscious cherry filling stays snug inside. For a bit of steam to escape during baking, cut a small slit into the top of each pie.
Step 5: Glaze and Bake
Whisk together the remaining egg and milk for a rich egg wash. Brush it generously over the tops of your pies, then sprinkle over a little coarse sugar if you like an extra sweet crunch. Pop the tray into a preheated 375°F oven and bake for 18 to 22 minutes, until the hand pies are beautifully golden and crisp. Let them cool on a wire rack before you dive in—trust me, the wait is worth it!
How to Serve Cherry Hand Pies
Garnishes
Dress up your Cherry Hand Pies with a dusting of powdered sugar, a drizzle of glaze, or even a scoop of vanilla ice cream on the side. A fresh mint sprig or a scattering of extra chopped cherries creates a bakery-worthy finish that brings out the colors and freshness of your pies.
Side Dishes
These pies are fantastic all on their own, but if you want a little something extra, try pairing them with a tangy fruit salad, a cup of strong coffee, or a tall glass of milk. For an afternoon tea spread, they sit perfectly beside finger sandwiches and a selection of cheeses.
Creative Ways to Present
For picnics or parties, wrap each Cherry Hand Pie in parchment and tie it with baker’s twine for a charming grab-and-go dessert. Stack them on a tiered cake stand for a dramatic centerpiece, or tuck them into little favor bags as edible gifts. No matter how you serve them, every bite looks as cheerful as it tastes!
Make Ahead and Storage
Storing Leftovers
If you happen to have a few Cherry Hand Pies left (rare, but it happens!), keep them in an airtight container at room temperature for up to two days. If you’d like to stretch that fresh-baked taste into the week, refrigerate them, where they’ll stay tasty for up to four days.
Freezing
Cherry Hand Pies are wonderfully freezer-friendly! Once completely cooled, wrap each pie individually in plastic wrap and store in a freezer bag. They’ll keep beautifully for up to two months. This makes them a perfect make-ahead treat for surprise guests or sudden cravings.
Reheating
For best results, reheat your pies directly from the fridge or freezer in a 325°F oven for 10 to 12 minutes. This brings back their crisp, flaky finish and ensures the cherry filling tastes just-baked. Skip the microwave if possible, as it can make the crusts a bit soggy.
FAQs
Can I use canned pie filling instead of fresh cherries?
Absolutely! If you’re pressed for time or cherries are out of season, canned cherry pie filling is a great shortcut. Just remember to watch the sweetness, as some canned fillings are sweeter than homemade, and adjust the sugar in the rest of the recipe if needed.
Do Cherry Hand Pies have to be served warm?
Not at all! Cherry Hand Pies taste amazing whether they’re warm from the oven or at room temperature. Warm pies have that ultra-comforting, melty filling, while cooled pies are extra portable and sturdy for packing in lunches or picnic baskets.
How do I prevent the filling from leaking out?
A solid seal is your secret weapon here! Make sure you brush the edges of the dough with egg wash, press firmly, and use a fork to crimp the edges all the way around. Cutting a small slit on top also helps by letting steam escape instead of forcing the filling out the sides.
Can I make these hand pies in advance?
Yes! You can make Cherry Hand Pies ahead of time and store them as detailed above. They’re even freezer-friendly, making them a phenomenal make-ahead option for parties, holidays, or whenever you want a sweet stash at the ready.
What other fruits work with this recipe?
While Cherry Hand Pies are classic, you can swap in blueberries, raspberries, sliced strawberries, or even a mix of your favorite summer fruits. Just keep the same filling ratios and method for endless fruity variations.
Final Thoughts
There’s something wonderfully joyful about baking Cherry Hand Pies—they’re easy, fun, and guaranteed to brighten any occasion. Whether you’re a seasoned baker or just starting out, give this recipe a try and be ready to fall in love with every bite!
Print
Cherry Hand Pies Recipe
- Total Time: 45 minutes
- Yield: 8 hand pies 1x
- Diet: Vegetarian
Description
These Cherry Hand Pies are a delightful treat with a sweet, fruit-filled center encased in flaky pie crust. Perfect for picnics, parties, or a special dessert at home.
Ingredients
For the Filling:
- 2 cups fresh or frozen cherries (pitted and halved)
- 1/4 cup granulated sugar
- 1 tablespoon cornstarch
- 1 tablespoon lemon juice
- 1/2 teaspoon almond extract
For the Crust:
- 1 package (2 sheets) refrigerated pie crusts (thawed)
- 1 egg (beaten, for egg wash)
- 1 tablespoon milk
- Coarse sugar for sprinkling (optional)
Instructions
- Preheat Oven and Prepare Filling: Preheat oven to 375°F (190°C) and line a baking sheet with parchment paper. In a saucepan, cook cherries, sugar, cornstarch, lemon juice, and almond extract until thickened.
- Prepare Crust and Assemble Pies: Roll out pie crusts, cut into circles, place filling, seal pies, and bake.
- Bake and Serve: Brush pies with egg wash, sprinkle with sugar, bake until golden, and cool before serving.
Notes
- You can use canned cherry pie filling for convenience.
- Enhance flavor with a pinch of cinnamon in the cherry mixture.
- Prep Time: 25 minutes
- Cook Time: 20 minutes
- Category: Dessert
- Method: Baking
- Cuisine: American
Nutrition
- Serving Size: 1 hand pie
- Calories: 260
- Sugar: 14 g
- Sodium: 150 mg
- Fat: 14 g
- Saturated Fat: 6 g
- Unsaturated Fat: 7 g
- Trans Fat: 0 g
- Carbohydrates: 31 g
- Fiber: 1 g
- Protein: 3 g
- Cholesterol: 25 mg


