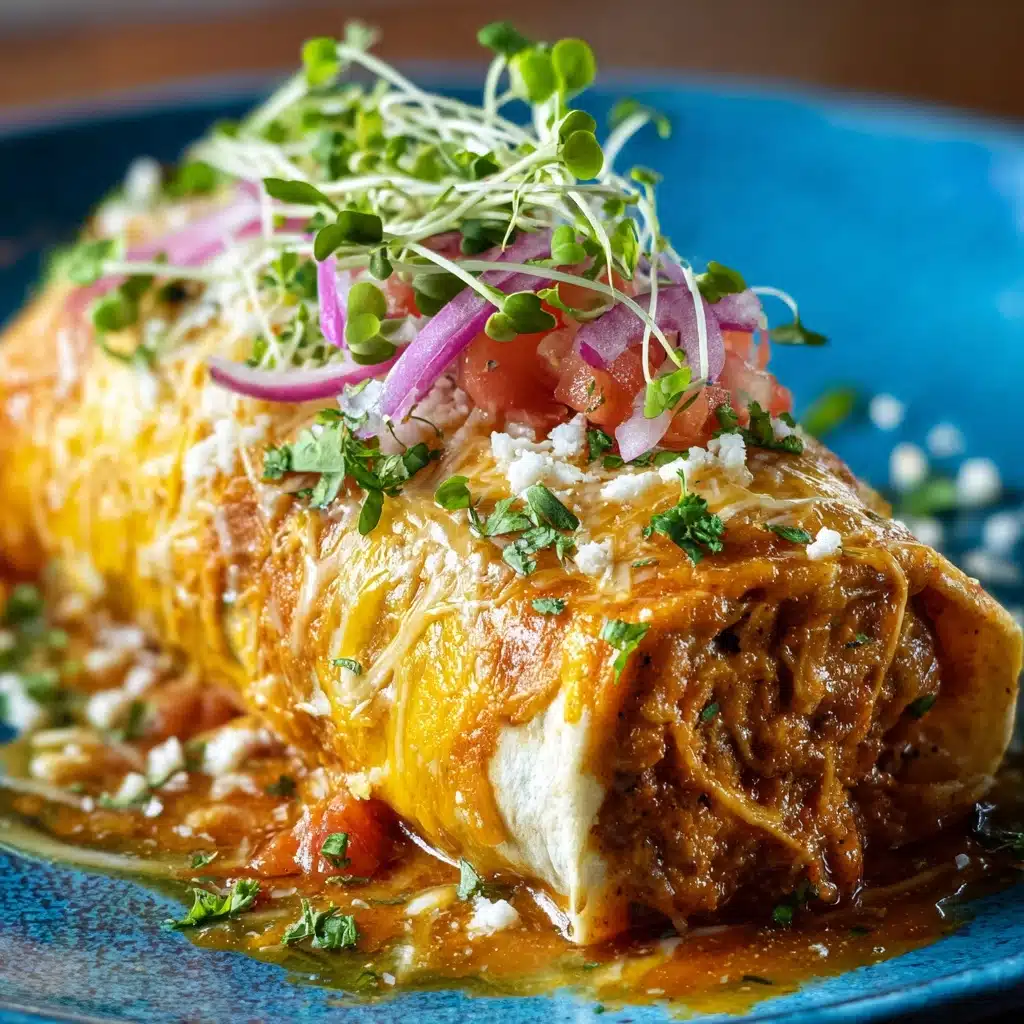
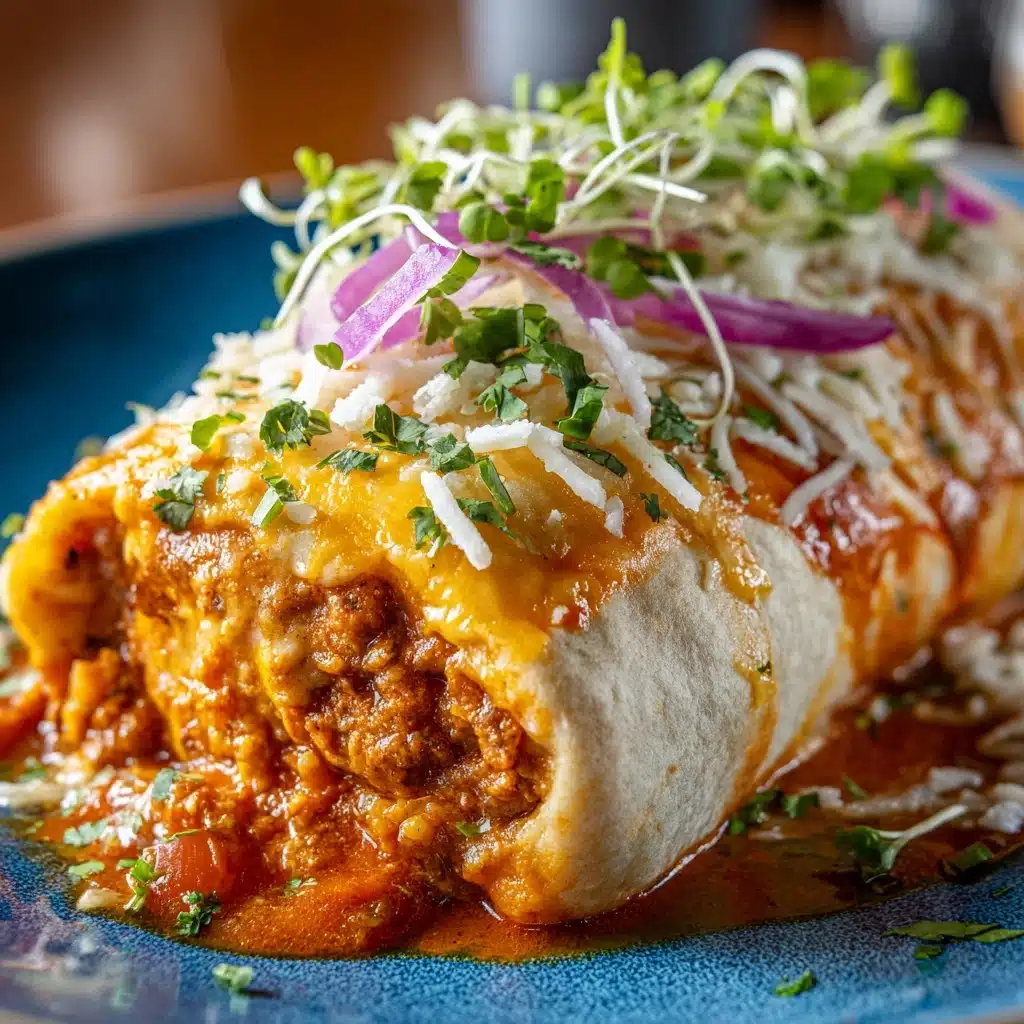
If you’re craving something indulgent, melty, and a touch nostalgic, the Homemade Quesarito is about to be your newest kitchen obsession. This Tex-Mex classic layers a soft, cheesy quesadilla around all your favorite burrito fillings — tender seasoned beef or chicken, zesty rice, creamy sauces, and maybe a scoop of beans if you’re feeling extra. Whether you’re a die-hard Taco Bell fan or just love playful, over-the-top flavors, making the Homemade Quesarito at home brings big flavor and pure satisfaction straight to your own table. Get ready for a crave-worthy, customizable meal that’ll earn you serious points with hungry friends and family!
Ingredients You’ll Need
What makes the Homemade Quesarito so magical? It’s the combination of simple, vibrant ingredients that deliver bold taste and an incredible mix of textures in every bite. Each component adds something special—so gather what you love, and let’s make food magic!
- Flour Tortillas: Large, burrito-size tortillas are the key to a sturdy, satisfying wrap. Warm them slightly to make them extra pliable.
- Shredded Cheddar Cheese: Melty cheddar binds the quesadilla “shell” and provides rich, gooey flavor.
- Cooked and Seasoned Ground Beef or Shredded Chicken: Choose your favorite protein and season it well for irresistibly savory filling.
- Cilantro-Lime Rice: This lifts the whole dish with a fragrant citrusy bite—use leftover or freshly made rice, depending on your mood.
- Sour Cream: Adds cool, creamy tang to balance out the other bold flavors.
- Nacho Cheese Sauce or Queso: For that iconic, drippy richness—don’t skimp!
- Refried Beans (Optional): Go for a layer of creamy beans if you want extra heartiness and fiber.
- Taco Sauce or Hot Sauce: A drizzle of heat and acidity wakes up the whole quesadrito experience.
- Nonstick Spray or Butter: Helps crisp up the outer layer for a golden finish—don’t skip this step for an irresistible crunch.
How to Make Homemade Quesarito
Step 1: Build the Cheesy Quesadilla Shell
On your kitchen counter, lay out one of the flour tortillas and evenly sprinkle half of the shredded cheddar cheese across its surface. Top with the second tortilla, gently pressing down to form a quesadilla. In a large skillet over medium heat, cook this stacked tortilla for about two to three minutes per side. You’re aiming for melty cheese on the inside and a beautifully golden exterior, which will become the sturdy, flavor-packed shell of your Homemade Quesarito. Set aside and let it cool slightly so it’s easier to handle for the next step.
Step 2: Fill with All the Goodness
Once your quesadilla shell has cooled just enough to handle, it’s time for the fun part—piling on the fillings! Carefully lift the top tortilla (or you can simply keep it intact and use a knife to nudge it open), then spoon the cooked and seasoned beef or chicken right into the center. Layer on your cilantro-lime rice, creamy refried beans if using, a scoop of sour cream, a generous drizzle of nacho cheese sauce or queso, and that splash of taco sauce or hot sauce. Be careful not to overfill—or you’ll be in for a delicious mess!
Step 3: Wrap It Up Burrito-Style
To seal the Homemade Quesarito, fold the bottom of the quesadilla up over the fillings. Next, fold in the sides tightly toward the center, and then roll it into a snug burrito shape. This “quesarito” technique keeps all the fillings tucked in, while that cheesy exterior locks everything together for an epic, gooey bite.
Step 4: Grill to Golden Perfection
Spray your skillet with nonstick spray or melt a little butter over medium heat. Gently place your wrapped Homemade Quesarito seam-side down and grill it for one to two minutes on each side. You’re looking for a gorgeous, lightly crisped crust that holds its shape and gives you that signature sizzle when you slice into it. Don’t rush—patience here gives you a perfect fusion of crispy shell and molten interior!
Step 5: Slice and Serve
Let your Homemade Quesarito rest for a moment, then slice it in half with a sharp knife for that tantalizing cross-section reveal. Serve piping hot with extra sauce, guacamole, or a spritz of lime. Every bite is cheesy, comforting, and loaded with Tex-Mex flavor!
How to Serve Homemade Quesarito
Garnishes
Go wild with the garnishes—fresh chopped cilantro, a handful of diced tomatoes, a sprinkle of green onions, or even a quick squeeze of lime are all fantastic. A dollop of extra sour cream or a side of guacamole takes every bite to the next level, letting each person customize their perfect masterpiece.
Side Dishes
While the Homemade Quesarito is a true meal-in-one, it pairs beautifully with classic Tex-Mex sides. Try crisp tortilla chips and salsa, a bright corn salad, or charred street corn for extra color and crunch. A refreshing agua fresca (or a zesty margarita!) ties the meal together, making it feel festive and fun.
Creative Ways to Present
Short on time? Slice the Homemade Quesarito into thick “rolls” for easy party snacks, or pile up a platter with different filling options so everyone can mix and match to their heart’s content. For a dramatic dinner, serve the quesarito on a sizzling cast iron pan, drizzled with extra queso and a few jalapeño slices for a showstopping twist.
Make Ahead and Storage
Storing Leftovers
If you find yourself with extra Homemade Quesarito halves, wrap them tightly in foil or plastic wrap. They’ll keep in the fridge for up to three days. The key is keeping them snug and sealed so the fillings stay moist and the shell doesn’t dry out.
Freezing
Both the assembled (but ungrilled) and fully cooked Homemade Quesarito can be frozen for future cravings. Wrap them individually in foil, then stash in a freezer-safe bag. To enjoy later, thaw overnight in the fridge before reheating for best texture and flavor.
Reheating
For the crispiest results, reheat leftover Homemade Quesarito in a skillet over medium-low heat, turning occasionally until warmed through. Microwave works in a pinch, but you’ll sacrifice that signature crunch. If reheating from frozen, cover loosely with foil and bake at 350°F until hot and melty inside—about 20 minutes.
FAQs
Can I make a vegetarian Homemade Quesarito?
Absolutely! Swap the ground beef or chicken for sautéed peppers, onions, mushrooms, or your favorite plant-based protein. The combo of beans and rice offers plenty of flavor and substance on its own, too.
How do I keep the Homemade Quesarito from falling apart?
Don’t overstuff: this is key! Be sure to grill the seam side down first, which helps everything seal together. Wrapping the burrito snugly with a bit of pressure makes all the difference in a sturdy, portable quesarito.
What cheese works best for the quesadilla shell?
Cheddar is classic, but Monterey Jack, pepper jack, or a Mexican blend melt beautifully and add extra flavor. Feel free to experiment and combine cheeses for your ultimate cheesy shell.
Is there a gluten-free option?
You can absolutely use large gluten-free tortillas and double-check that all sauces and fillings are gluten-free. The technique remains the same, so everyone can enjoy a Homemade Quesarito regardless of dietary needs.
Can I prep any parts in advance?
Yes! The filling options—meat, rice, beans—can be cooked and refrigerated up to three days ahead of time. You can even assemble the quesadilla shell in advance and keep it chilled so assembling your Homemade Quesarito is lightning fast on busy days.
Final Thoughts
Few meals deliver the same wow-factor and comfort as a Homemade Quesarito. It’s a playful, flavor-packed twist on two Tex-Mex icons, easy to customize and nearly impossible not to love. Gather your favorite toppings, invite your people, and treat yourself to the joy of homemade cheesy goodness—trust me, your taste buds will thank you!
Print
Homemade Quesarito Recipe
- Total Time: 25 minutes
- Yield: 2 servings 1x
- Diet: Non-Vegetarian
Description
Learn how to make a delicious Homemade Quesarito that combines the best of a quesadilla and a burrito in one tasty dish. Filled with seasoned meat, rice, cheese, and more, this Tex-Mex creation is sure to become a family favorite.
Ingredients
For the Quesadilla Layers:
- 2 large flour tortillas (burrito size)
- 1 cup shredded cheddar cheese
For the Filling:
- 1 cup cooked and seasoned ground beef or shredded chicken
- ½ cup cooked rice (preferably cilantro-lime rice)
- ¼ cup sour cream
- ¼ cup nacho cheese sauce or queso
- ¼ cup refried beans (optional)
- 2 tablespoons taco sauce or hot sauce
- Nonstick spray or butter for grilling
Instructions
- Prepare the Quesadilla Layers: Lay out one tortilla and sprinkle ½ cup of shredded cheese evenly across it. Place the second tortilla on top to form a quesadilla.
- Cook the Quesadilla: Heat a large skillet over medium heat and cook the quesadilla for 2 to 3 minutes on each side until the cheese is melted and the tortilla is golden. Remove from the pan and let cool slightly.
- Fill and Assemble: Once cooled, add cooked beef or chicken, rice, sour cream, nacho cheese, beans (if using), and taco sauce to the center of the quesadilla. Fold and roll tightly into a burrito shape.
- Grill: Grill the assembled quesarito in a skillet until lightly crisped and sealed, about 1 to 2 minutes on each side.
- Serve: Slice in half and serve warm with extra sauce or guacamole.
Notes
- Customize your quesarito with additional toppings like fajita veggies, jalapeños, or chipotle sauce.
- You can prepare the filling in advance for a quick weeknight meal.
- Prep Time: 15 minutes
- Cook Time: 10 minutes
- Category: Main Course
- Method: Stovetop
- Cuisine: Tex-Mex
Nutrition
- Serving Size: 1 quesarito
- Calories: 650
- Sugar: 4g
- Sodium: 980mg
- Fat: 34g
- Saturated Fat: 15g
- Unsaturated Fat: 14g
- Trans Fat: 0g
- Carbohydrates: 55g
- Fiber: 4g
- Protein: 30g
- Cholesterol: 90mg


