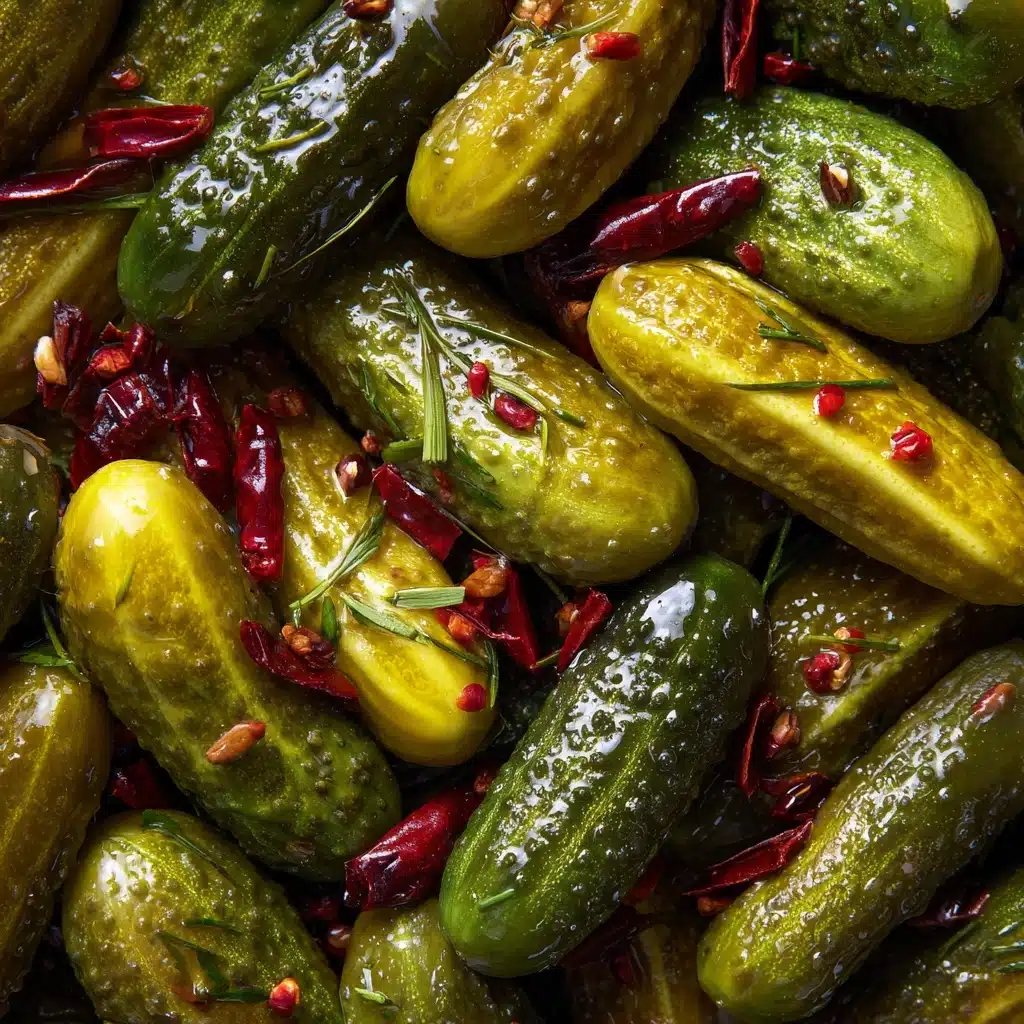
Crunchy, tangy, and bursting with fresh dill and garlic flavor, Homemade Claussen Pickles are a refrigerator classic you’ll want to make on repeat. These no-cook pickles are everything you hope for in a deli-style spear—satisfyingly crisp, perfectly balanced between tart and salty, and flecked with just the right amount of spice. If you love that just-picked garden freshness and long for pickles that snap satisfyingly between your teeth, you’re in for a real treat. Homemade Claussen Pickles are astonishingly simple to prepare and will become your go-to for snacking, sandwich-stacking, and all your summer cookout cravings.
Ingredients You’ll Need
With Homemade Claussen Pickles, you’ll discover just how much flavor you can coax out of a handful of pantry staples and fresh produce. Each ingredient offers its own unique magic—some bring aromatic notes, others boost crunch, and a few deliver that unmistakable pickle zing.
- Pickling cucumbers: Small, firm cukes are key for that signature snap; make sure they’re super fresh and unwaxed.
- Cold water: Using cold, filtered water helps the pickles stay extra crisp and bright.
- Distilled white vinegar: Crisp and clean, this vinegar gives the pickles their classic tang without overpowering aromatics.
- Pickling or kosher salt: Essential for brining; avoid iodized salt to keep the brine clear and the flavor pure.
- Garlic cloves: Smashed and added to each jar for irresistible flavor and aroma.
- Mustard seeds: Add warm, earthy depth and a subtle hint of spice to the brine.
- Coriander seeds: Contribute citrusy top notes and extra complexity.
- Black peppercorns: A gentle backbone of heat and aroma without overwhelming the finished pickle.
- Red pepper flakes (optional): For those who appreciate a subtle kick, this ingredient turns up the heat just a touch.
- Fresh dill or dried dill weed: Bold, bright, unmistakably pickle-y—dill is a must here, so go generous!
- Bay leaf (optional): Adds aromatic complexity, especially enjoyable if you love layered flavors.
How to Make Homemade Claussen Pickles
Step 1: Prep Your Cucumbers
First things first—give your cucumbers a good scrub under cool running water, especially if they’re fresh from the garden or farmers’ market. Decide whether you want spears, slices, or whole pickles. Spears are great for sandwiches and snacking, rounds are ideal for burgers or salads, and small, whole cucumbers stay extra crisp. Slice or leave them whole as desired, and set aside.
Step 2: Layer the Flavor Base in Jars
Grab your glass jar(s) and start building irresistible layers at the bottom. Divide the garlic, mustard seeds, coriander seeds, black peppercorns, red pepper flakes (if using), dill, and bay leaf (if using) between each jar. This ensures every bite is packed with punchy, aromatic flavor from top to bottom—no plain pickles here!
Step 3: Pack Cucumbers Into Jars
Tightly pack the prepared cucumbers into the jars, arranging them so they fit snugly. This not only maximizes your jar space but also keeps the pickles well submerged in the brine. Leave about a half-inch of headspace at the top; this helps the brine fully envelop the cucumbers for even pickling.
Step 4: Mix Up the Brine
In a large bowl or pitcher, combine the cold water, distilled vinegar, and pickling salt. Stir until the salt is completely dissolved—this is crucial, as any undissolved salt could leave gritty bits behind. The secret to Homemade Claussen Pickles is this chilled brine, which keeps the cucumbers irresistibly crunchy.
Step 5: Pour and Submerge
Pour the cold brine evenly over the cucumbers, ensuring every spear or slice is completely covered. If you notice any cucumbers floating, you can use a fermentation weight or even a small, clean resealable bag filled with extra brine to keep everything submerged. This step preserves crunch and prevents spoilage.
Step 6: Cover and Chill
Seal the jars with a tight-fitting lid and transfer them to the refrigerator. Now comes the hardest part—waiting! Let them chill for at least three to five days, tasting as you go, until they hit your preferred level of tanginess. The longer they sit, the more flavor they’ll develop. Your Homemade Claussen Pickles will be ready to eat within a few days but will keep getting better the longer they marinate.
How to Serve Homemade Claussen Pickles

Garnishes
For a pop of color and extra flavor, sprinkle your Homemade Claussen Pickles with a dusting of freshly chopped dill or parsley right before serving. Thinly sliced red onion, cracked black pepper, or even a pinch of smoked paprika also make beautiful visual (and tasty) finishing touches.
Side Dishes
Few things are better than a cold, crunchy pickle alongside a summer BBQ feast. Homemade Claussen Pickles are a natural fit for burgers, grilled hot dogs, hearty sandwiches, and classic potato salad. They also brighten up charcuterie boards, cheese plates, and even simple lunchtime wraps.
Creative Ways to Present
Try skewering pickle spears onto cocktail picks for an instant “pickle pop” appetizer, or dice them up for an out-of-this-world egg salad. You can even tuck Homemade Claussen Pickles into lettuce wraps or slice them thin for a super fresh salad topping. Their snappy texture and big flavor make them fun to serve in all kinds of unexpected ways.
Make Ahead and Storage
Storing Leftovers
One of the best things about Homemade Claussen Pickles is how well they keep. Simply store them in their brine, tightly sealed in the fridge, and you’ll have boldly flavored pickles on hand for up to two months. Just be sure your cucumbers stay fully submerged to maintain their irresistible crunch and prevent any spoilage.
Freezing
While the freezer might seem tempting for longer storage, it’s not recommended for these pickles. Freezing can seriously compromise their delightful crunch, resulting in a limp or soggy texture once thawed. Stick to the fridge method for best results, and enjoy them while they’re crisp and vibrant.
Reheating
There’s no need (and no benefit) to reheating Homemade Claussen Pickles; these beauties are meant to be enjoyed chilled and straight from the fridge. If you’re using them in a warm dish or on a hot sandwich, simply add them last so all that snappy texture stays intact.
FAQs
Can I use regular cucumbers instead of pickling cucumbers?
While you can use regular cucumbers in a pinch, pickling cucumbers are preferred because they’re firmer and less watery. They hold up far better to the brining process, staying crisp and snappy for weeks.
What makes Homemade Claussen Pickles so crunchy?
The secret is in the cold brine and the use of super-fresh, firm cucumbers. Avoid cooking or heating the brine, and always chill the cucumbers beforehand for the absolute best texture.
Can I reuse the brine for another batch?
For safety and best results, it’s not recommended to reuse pickle brine. Spent brine can lose its flavor strength and may not have the same preserving power, so stick with fresh brine for each new jar.
Do I have to use all the spices listed?
The spices and dill give Homemade Claussen Pickles their classic flavor, but you can customize the mix to suit your preferences. Love garlic? Add more. Want it mild? Skip the red pepper flakes. The base recipe is adaptable.
How soon can I eat them?
You’ll notice the flavor coming together after three days in the fridge, but if you can hold out for five days or even a week, you’ll be rewarded with fully developed, tangy, crunchy pickles. The wait is so worth it!
Final Thoughts
If you’ve never tried making your own Homemade Claussen Pickles before, I hope you’re inspired to jump in, because the results are truly special. There’s something so rewarding about opening your fridge and seeing jars of crisp, flavor-packed pickles you made from scratch. Grab some fresh cucumbers, gather a few simple spices, and treat yourself to the best pickles you’ve ever tasted—you won’t want to go back to store-bought!
Print
Homemade Claussen Pickles Recipe
- Total Time: 20 minutes (plus 3–5 days chilling)
- Yield: 2–3 quarts 1x
- Diet: Vegan, Gluten-Free
Description
Learn how to make your own crisp and flavorful Claussen-style pickles at home with this easy recipe. These refrigerator pickles are tangy, garlicky, and perfect for snacking or adding to sandwiches.
Ingredients
Pickles:
- 2 pounds pickling cucumbers (small, firm, and washed)
Brine:
- 4 cups cold water
- 1 1/2 cups distilled white vinegar
- 1/3 cup pickling or kosher salt
Seasonings:
- 6 cloves garlic (peeled and smashed)
- 2 teaspoons mustard seeds
- 2 teaspoons coriander seeds
- 1 teaspoon black peppercorns
- 1/4 teaspoon red pepper flakes (optional)
- 6 sprigs fresh dill (or 2 tablespoons dried dill weed)
- 1 bay leaf (optional)
Instructions
- Slice cucumbers: Cut into spears, rounds, or leave whole if small enough.
- Prepare jars: Place garlic, mustard seeds, coriander seeds, peppercorns, red pepper flakes, dill, and bay leaf into jars.
- Pack cucumbers: Fill jars tightly with cucumbers, leaving space at the top.
- Make brine: Mix water, vinegar, and salt until dissolved. Pour over cucumbers.
- Refrigerate: Seal jars and refrigerate for 3–5 days before enjoying.
Notes
- Avoid iodized salt to prevent clouding of brine.
- For extra crunch, use fresh, firm cucumbers and chill them before pickling.
- Prep Time: 20 minutes
- Cook Time: 0 minutes
- Category: Condiment
- Method: No-Cook
- Cuisine: American
Nutrition
- Serving Size: 1 spear
- Calories: 5
- Sugar: 0g
- Sodium: 250mg
- Fat: 0g
- Saturated Fat: 0g
- Unsaturated Fat: 0g
- Trans Fat: 0g
- Carbohydrates: 1g
- Fiber: 0g
- Protein: 0g
- Cholesterol: 0mg


