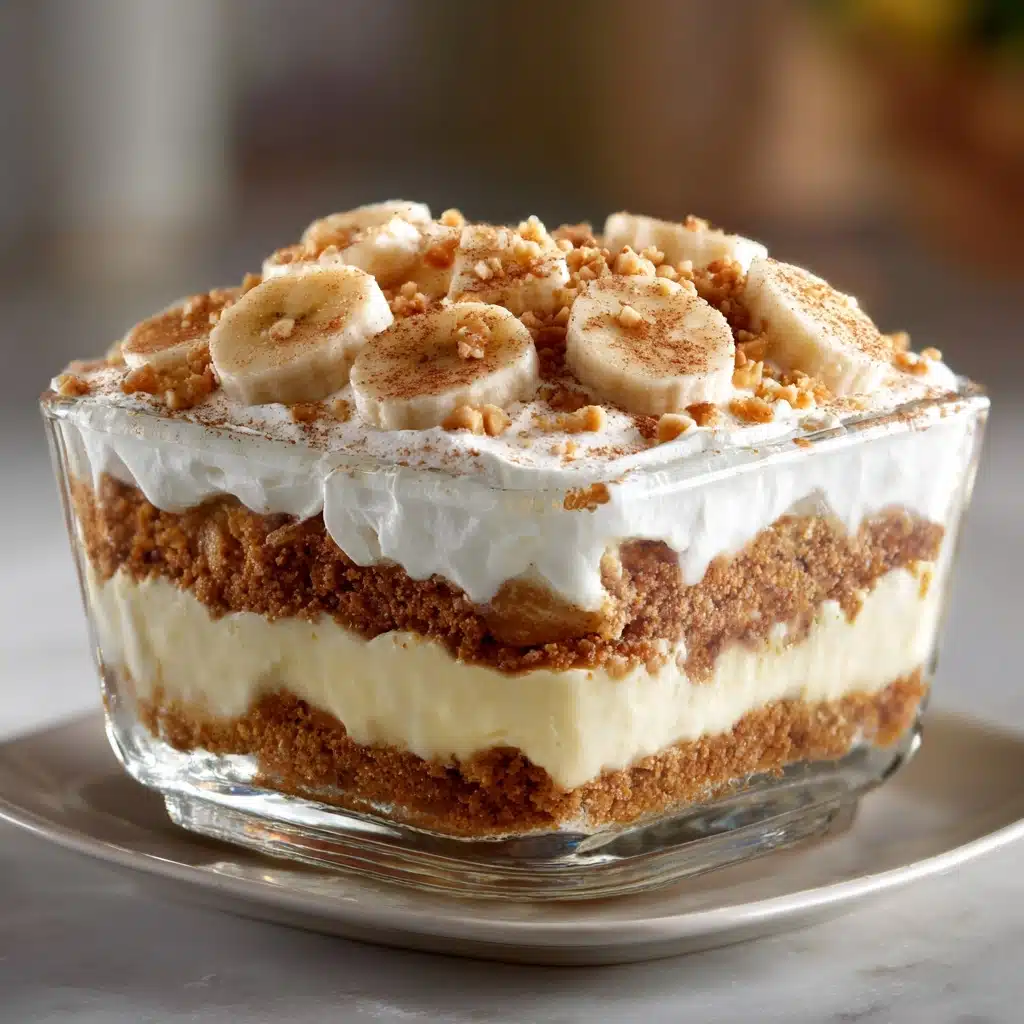
If you’re looking for a dessert that’s cool, creamy, and brimming with nostalgic flavors, Banana Pudding Lush is absolutely swoon-worthy. Each bite weaves together layers of buttery vanilla wafer crust, fluffy whipped topping, ripe bananas, and velvety pudding — it’s everything you crave in a Southern favorite, with a fun, no-bake twist. Whether you’re making this for a family potluck or just want to indulge at home with a spoon, Banana Pudding Lush is one of those treats that brings pure joy and comfort in every chilled bite.
Ingredients You’ll Need
Ingredients You’ll Need
You’ll be amazed at how a handful of grocery store staples transform into something so downright decadent. Every element here plays a vital role — from the crunch of vanilla wafers to the creamy tang of whipped topping — building irresistible textures and flavors. Gather these essentials and let’s get started!
- Crushed vanilla wafers: These cookies form a buttery, flavorful base that holds up perfectly beneath all the creamy layers.
- Unsalted butter (melted): Melted butter binds the crushed wafers together for a sturdy crust with rich, buttery flavor.
- Instant banana pudding mix: This is the magic that delivers that classic banana flavor and signature creamy layer in Banana Pudding Lush.
- Cold milk: Whisked with the pudding mix, milk helps achieve that perfectly thick, luscious consistency.
- Cream cheese (softened): The secret to a tangy, rich cream layer that beautifully contrasts the sweetness of the other layers.
- Powdered sugar: Sweetens and smooths the cream cheese without any graininess.
- Whipped topping (like Cool Whip): Gives your lush those signature fluffy, cloud-like layers with minimal effort.
- Ripe bananas (sliced): Slices of fresh banana bring authentic fruit flavor and a soft, creamy texture to each bite.
- Additional vanilla wafers and banana slices (for garnish): These finishing touches take your Banana Pudding Lush to the next level in both flavor and presentation.
How to Make Banana Pudding Lush
Step 1: Make the Wafer Crust
Begin by combining the crushed vanilla wafers with melted butter in a mixing bowl. Stir until every crumb is coated and the mixture resembles deliciously wet sand. Press this mixture evenly and firmly into the bottom of a 9×9-inch dish, using a measuring cup or your hands to ensure a tight, sturdy base. Pop the dish into the fridge while you move onto the next step — this helps the crust firm up nicely.
Step 2: Whisk the Banana Pudding
Pour the instant banana pudding mix into a bowl, then whisk in the cold milk. Give it a solid two minutes of whisking — you’ll see it thicken right up into a creamy, dreamy pudding. Set this aside to allow the flavors to bloom while you prepare the cream cheese layer.
Step 3: Make the Cream Cheese Layer
In a separate bowl, beat the softened cream cheese with the powdered sugar until completely smooth and fluffy. This step is crucial for that silky texture. Once blended, gently fold in half of the whipped topping until no streaks remain, creating a lighter, airier cream.
Step 4: Layer the Cream Mixture
Take your chilled crust out of the refrigerator and spread the cream cheese mixture evenly over the top. Use a spatula to smooth it right to the edges so every bite has that perfect tangy layer.
Step 5: Add the Bananas
Arrange a single layer of sliced bananas over the cream cheese mixture. Be generous here — this is where the real banana flavor shines through and makes Banana Pudding Lush so special.
Step 6: Spread the Banana Pudding
Carefully spread the prepared banana pudding over the banana layer. The pudding will cradle the banana slices and infuse even more luscious banana flavor into every bite.
Step 7: Top with Whipped Topping
Finish things off by gently spreading the remaining whipped topping over the pudding layer. This adds a final creamy, dreamy finish that makes the dessert look extra inviting.
Step 8: Chill and Garnish
Cover your Banana Pudding Lush and let it set in the refrigerator for at least 4 hours (overnight is even better for easy slicing and maximum flavor meld). Before serving, garnish generously with extra banana slices and vanilla wafers for a classic, crowd-pleasing look.
How to Serve Banana Pudding Lush
Garnishes
Fresh banana slices and whole or crumbled vanilla wafers add visual flair and extra texture to every serving. If you want added crunch, toss a scatter of freshly chopped wafer bits on top just before serving. For a playful finish, a light dusting of powdered sugar or even a drizzle of caramel sauce makes Banana Pudding Lush feel bakery-worthy.
Side Dishes
Banana Pudding Lush is indulgent enough to steal the spotlight solo, but if you’re serving a Southern-style dinner, a refreshing fruit salad or light citrus sorbet provides a bright, tangy counterpoint. Coffee or sweet tea pairs perfectly with each cool, creamy bite.
Creative Ways to Present
For special occasions, assemble Banana Pudding Lush in individual jars or clear cups to show off those beautiful layers — guests always love the personalized touch. You could also double the recipe for a 13×9-inch pan if you’re feeding a crowd, or stack mini squares on a tiered dessert tray for an elegant party spread.
Make Ahead and Storage
Storing Leftovers
Cover the dish tightly with plastic wrap or transfer leftovers to an airtight container. Banana Pudding Lush will keep well in the refrigerator for up to 3 days. Just note that the bananas may darken a bit over time, but the flavor stays delightful.
Freezing
While it’s best enjoyed fresh, you can freeze Banana Pudding Lush before adding the final fresh banana garnish. Wrap the whole dish in plastic wrap and a layer of foil for up to a month. Thaw in the refrigerator overnight, top with new banana slices and vanilla wafers, then serve.
Reheating
There’s no need to reheat Banana Pudding Lush, since it’s meant to be served cold and refreshing. If you have leftovers, just enjoy straight from the fridge for that perfect chilled texture and flavor.
FAQs
Can I use homemade whipped cream instead of whipped topping?
Absolutely! If you prefer homemade whipped cream, whip 1 cup of heavy cream with 2 tablespoons of powdered sugar until stiff peaks form. Fold it in gently following the same steps — the result is a touch richer but just as delicious in your Banana Pudding Lush.
How do I keep the banana slices from turning brown?
To help prevent browning, slice the bananas just before layering or serving. You can also lightly brush or spritz them with lemon juice, although this may slightly alter the flavor. For the freshest look, add banana slices as a garnish at the very last minute.
Can I make Banana Pudding Lush gluten-free?
Yes! Swap the vanilla wafers for a certified gluten-free substitute and double-check that your pudding mix is gluten-free. The rest of the ingredients are naturally gluten-free, so it’s an easy adjustment.
What’s the best way to crush vanilla wafers?
Place them in a zip-top bag and use a rolling pin to gently smash them into fine crumbs. For super-fine crumbs, a food processor does the trick in seconds. Try to avoid large chunks for the most cohesive crust in your Banana Pudding Lush.
Can I customize this recipe with other flavors?
Definitely! Try adding a swirl of chocolate or caramel sauce in between the layers, or mix in a few strawberries for a fruity twist. Some folks love swapping in cheesecake-flavored pudding for a different spin, but the original banana version is always a crowd favorite.
Final Thoughts
Banana Pudding Lush has an irresistible blend of creamy, crunchy, and fruity layers that make it the perfect anytime treat. Whether you serve it for a big occasion or a cozy family dessert, every forkful brings smiles all around. Give this recipe a try — you’ll see just how quickly Banana Pudding Lush becomes a favorite in your own kitchen!
Print
Banana Pudding Lush Recipe
- Total Time: 4 hours 20 minutes
- Yield: 9 servings 1x
- Diet: Vegetarian
Description
Indulge in the creamy, dreamy goodness of this Banana Pudding Lush. Layers of vanilla wafers, banana pudding, ripe bananas, and a fluffy cream cheese filling come together to create a delightful dessert that will have everyone asking for seconds.
Ingredients
Crust:
- 1 1/2 cups crushed vanilla wafers
- 1/3 cup unsalted butter, melted
Cream Cheese Layer:
- 1 package (3.4 oz) instant banana pudding mix
- 1 1/2 cups cold milk
- 8 oz cream cheese, softened
- 1/2 cup powdered sugar
- 1 tub (8 oz) whipped topping (like Cool Whip)
- 2–3 ripe bananas, sliced
- additional vanilla wafers and banana slices for garnish
Instructions
- Prepare the Crust: Mix crushed vanilla wafers with melted butter, press into a 9×9-inch dish, and refrigerate.
- Make the Cream Cheese Layer: Whisk banana pudding mix and milk until thickened. Beat cream cheese and powdered sugar until smooth. Fold in half of the whipped topping.
- Assemble the Layers: Spread cream cheese mixture over the crust. Layer with sliced bananas, then spread the banana pudding over the bananas. Top with remaining whipped topping.
- Garnish and Chill: Garnish with banana slices and wafers. Chill for at least 4 hours before serving.
Notes
- For extra crunch, sprinkle chopped vanilla wafers on top just before serving.
- To prevent browning, add fresh banana slices right before serving.
- Prep Time: 20 minutes
- Cook Time: 0 minutes
- Category: Dessert
- Method: No-Bake
- Cuisine: Southern American
Nutrition
- Serving Size: 1 square
- Calories: 310
- Sugar: 22g
- Sodium: 190mg
- Fat: 17g
- Saturated Fat: 10g
- Unsaturated Fat: 7g
- Trans Fat: 0g
- Carbohydrates: 35g
- Fiber: 1g
- Protein: 3g
- Cholesterol: 40mg

