
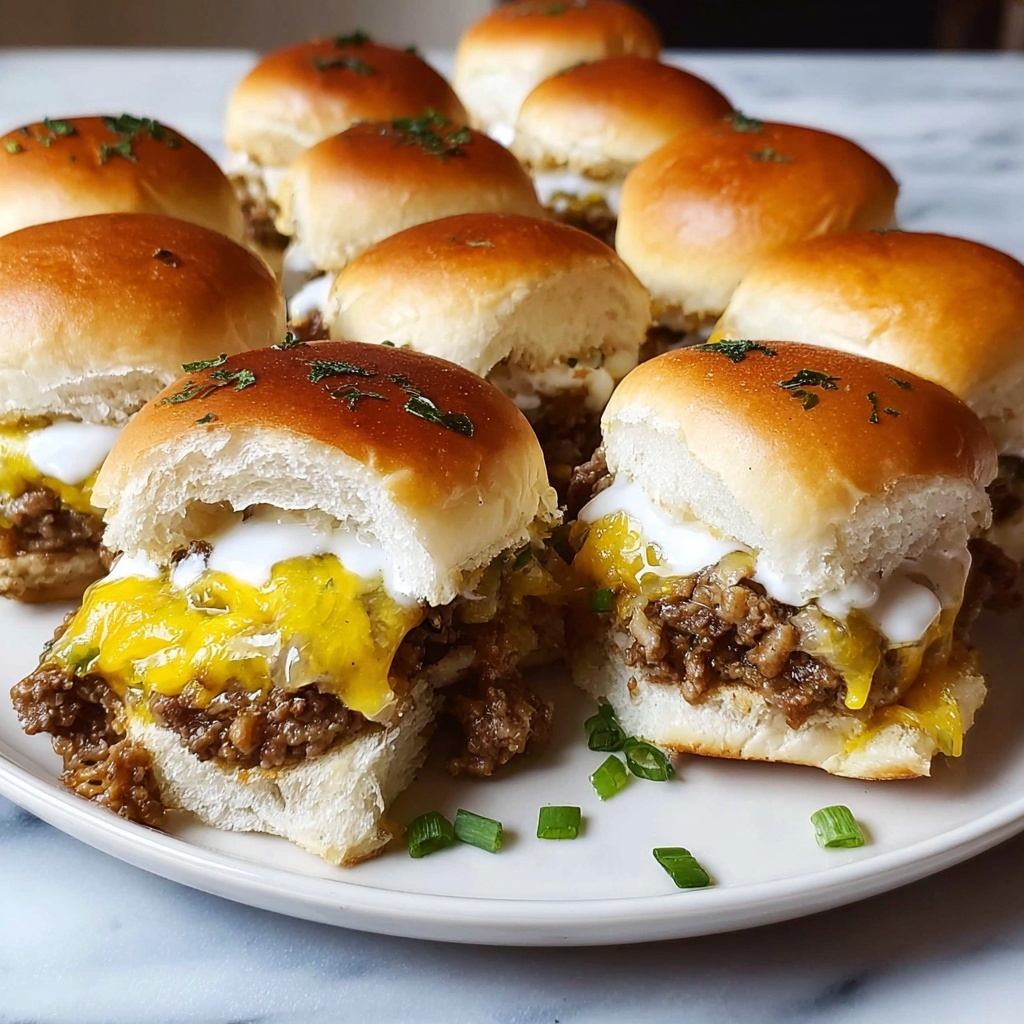
If you’re looking to infuse your holiday gathering with something truly special, look no further than Christmas Sliders: 5 Irresistibly Delicious Reasons to Try Recipe. These little bites of joy combine tender, flavorful turkey patties with melty cheese, a tangy spread, and soft slider buns, creating a festive treat that’s easy to share and impossible to resist. Whether you’re hosting a party or craving a quick holiday-inspired snack, these sliders promise to become a new favorite, delivering a perfect balance of savory, creamy, and comforting flavors in every bite.

Ingredients You’ll Need
To whip up these delightful Christmas sliders, the ingredient list is delightfully simple yet thoughtfully selected. Each element plays a crucial role, building layers of flavor, texture, and vibrant color to make these sliders shine on your festive table.
- 1 lb ground turkey: A lean and juicy base that keeps the sliders light yet satisfying.
- 1 cup shredded cheese: Melted cheese gives a creamy, gooey texture that binds everything together beautifully.
- 1/2 cup diced onions: Adds a hint of sweetness and a slight crunch for depth in every bite.
- 1/4 cup mayonnaise: Keeps the patties moist and adds richness.
- 1 tablespoon mustard: Provides a tangy kick that perfectly balances the creamy mayo.
- 12 slider buns: Soft and fluffy, these are the perfect size for easy handheld enjoyment.
- Salt and pepper to taste: Essential seasonings that enhance all the other flavors.
How to Make Christmas Sliders: 5 Irresistibly Delicious Reasons to Try Recipe
Step 1: Preheat Your Oven
Start your festive cooking by setting your oven to 350°F (175°C). This careful temperature ensures your sliders cook evenly, locking in juices while forming a pleasantly browned crust.
Step 2: Mix the Magic
Combine the ground turkey, shredded cheese, diced onions, mayonnaise, mustard, salt, and pepper in a large mixing bowl. This step is where all the ingredients start to harmonize, setting the stage for that unforgettable festive flavor.
Step 3: Shape Your Sliders
Form the mixture into 12 small, evenly-sized patties that fit perfectly inside your slider buns. Uniform size means they’ll cook evenly and look utterly inviting.
Step 4: Arrange on Baking Sheet
Place each patty on a baking sheet, giving them space to cook properly and develop that delightful texture without steaming.
Step 5: Bake to Perfection
Bake the sliders for about 20 minutes or until they’re cooked through. You’ll know they’re ready when they’re juicy inside and slightly golden on the edges.
Step 6: Assemble and Serve
Place each patty into a slider bun, and voila! Your Christmas Sliders are ready to be enjoyed. The assembly lets you add any final touches or garnishes to personalize every bite.
How to Serve Christmas Sliders: 5 Irresistibly Delicious Reasons to Try Recipe
Garnishes
Adding garnishes is a fantastic way to elevate these sliders from delicious to unforgettable. Try fresh greens like arugula or spinach for a peppery contrast, or sliced pickles to introduce a refreshing crunch that complements the savory patties.
Side Dishes
Pair your sliders with classic holiday sides like roasted sweet potatoes, a crisp winter salad, or even some warm cranberry sauce to echo the festive spirit. These sides create a balanced and satisfying meal that will have everyone asking for seconds.
Creative Ways to Present
Presentation always amps up the excitement at any holiday feast. Serve your sliders on a rustic wooden board with toothpicks for easy grabbing, or arrange them in a festive platter lined with holiday-themed napkins and garnishes. A little creativity makes every bite feel like a celebration!
Make Ahead and Storage
Storing Leftovers
If you have any sliders left, store them in an airtight container in the refrigerator. They’ll stay fresh for up to 3 days, making them perfect for quick lunches or snacks the next day.
Freezing
You can freeze the cooked patties before assembling the sliders. Wrap them tightly in plastic wrap and place them in a freezer bag. When ready, thaw overnight in the fridge and warm them up for a speedy and delicious meal anytime.
Reheating
For the best results, reheat the sliders in a 350°F oven for 10 minutes to restore that freshly-baked texture. If you’re short on time, microwaving works too, but the oven crisp is truly worth the wait.
FAQs
Can I use ground beef instead of turkey?
Absolutely! Ground beef is a great substitute if you prefer a richer flavor, though ground turkey keeps the sliders lighter and just as tasty.
Are these sliders suitable for meal prep?
Yes, these Christmas Sliders are perfect for meal prepping. You can make the patties ahead, freeze them, and assemble fresh when ready to eat.
Can I add other spices to the mix?
Certainly. Feel free to add garlic powder, paprika, or your favorite herbs to customize the flavor to your liking.
What cheese works best in these sliders?
Cheddar and mozzarella work really well for their meltiness and flavor, but feel free to experiment with Swiss or Monterey Jack.
How do I prevent the sliders from drying out?
Including mayonnaise in the mixture helps keep the patties moist, and baking them just until cooked through ensures they stay juicy.
Final Thoughts
There’s something truly heartwarming about sharing a plate of Christmas Sliders: 5 Irresistibly Delicious Reasons to Try Recipe with loved ones during the holidays. They bring joy not just in flavor but in the ease and fun of making and serving them. Give this recipe a try and let these sliders become a radiant centerpiece in your festive celebrations!
Print
Christmas Sliders: 5 Irresistibly Delicious Reasons to Try Recipe
- Prep Time: 10 minutes
- Cook Time: 20 minutes
- Total Time: 30 minutes
- Yield: 12 servings
- Category: Main Course
- Method: Baking
- Cuisine: American
- Diet: Low Fat
Description
Delight in these festive Christmas Sliders, featuring juicy ground turkey patties blended with savory cheese, onions, mayonnaise, and mustard, all baked to perfection and nestled inside soft slider buns. Perfect for holiday gatherings or casual snacking, these sliders are irresistibly delicious and easy to prepare.
Ingredients
Slider Patties
- 1 lb ground turkey
- 1 cup shredded cheese
- 1/2 cup diced onions
- 1/4 cup mayonnaise
- 1 tablespoon mustard
- Salt and pepper to taste
Assembly
- 12 slider buns
Instructions
- Preheat Oven: Preheat your oven to 350°F (175°C) to prepare for baking the sliders.
- Mix Ingredients: In a large bowl, thoroughly combine the ground turkey, shredded cheese, diced onions, mayonnaise, mustard, salt, and pepper until evenly mixed.
- Form Patties: Shape the mixture into 12 small, evenly sized patties, each fitting the size of the slider buns.
- Arrange Patties: Place the formed patties evenly spaced on a baking sheet lined with parchment paper or lightly greased.
- Bake Patties: Bake in the preheated oven for 20 minutes, or until the patties are cooked through and reach an internal temperature of 165°F (74°C).
- Assemble Sliders: Once the patties are baked, place each one inside a slider bun. Serve immediately while warm.
Notes
- For extra flavor, consider adding herbs such as parsley or thyme to the patty mixture.
- You can substitute ground turkey with ground chicken or lean beef based on preference.
- Ensure the patties are fully cooked by checking the internal temperature with a meat thermometer.
- Slider buns can be warmed in the oven for 2-3 minutes before assembly for a toasty finish.
- Customize with additional toppings like lettuce, tomato, or pickles for more variety.

