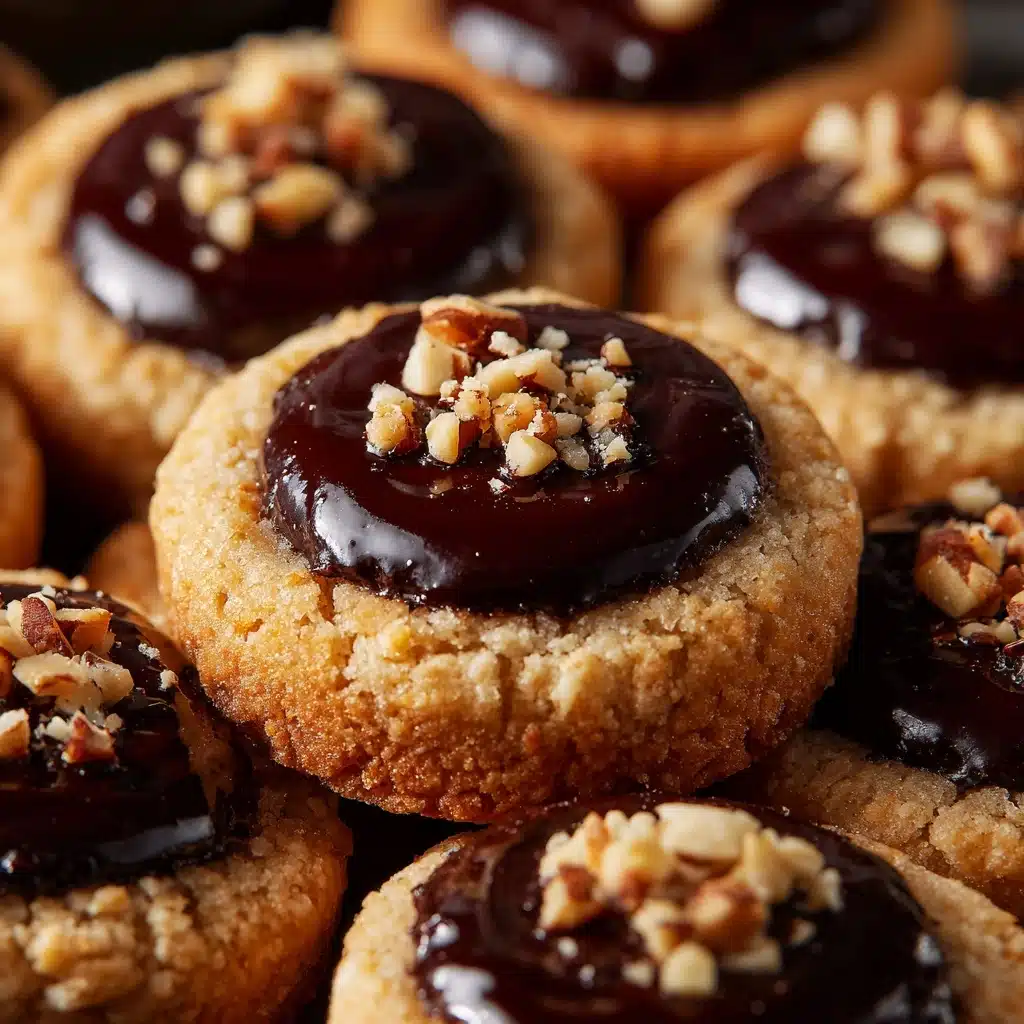
If you’re hunting for a cookie recipe that delivers pure joy in every bite, look no further than these Chocolate Hazelnut Thumbprint Cookies. Picture buttery cookies with a delicate crunch of hazelnuts, each nestling a pool of rich, creamy chocolate hazelnut spread in the center. Whether you bake them for your holiday cookie tray or as a treat to share with friends, these cookies are guaranteed to charm everyone with their irresistible flavor and texture.

Ingredients You’ll Need
These Chocolate Hazelnut Thumbprint Cookies come together with an irresistibly short list of pantry staples that truly shine. Each ingredient was chosen for how it contributes to the nutty, chocolatey bliss and that perfect tender bite—no fuss, only flavor-forward results every time.
- Unsalted butter (1/2 cup, softened): The foundation for a melt-in-your-mouth, tender crumb; softened butter ensures everything blends together smoothly.
- Granulated sugar (1/3 cup): Offers sweetness and helps the cookies hold their classic shape.
- Light brown sugar, packed (1/4 cup): Adds a subtle molasses warmth and makes every bite even more flavorful.
- Egg yolk (1 large): Enriches the dough for a softer, richer cookie.
- Vanilla extract (1/2 teaspoon): Just a splash brings out all the cozy, aromatic notes.
- All-purpose flour (1 cup): The sturdy base that forms the perfect canvas for our flavors.
- Salt (1/4 teaspoon): Essential for balancing sweetness and enhancing those nutty, chocolate undertones.
- Finely chopped hazelnuts (1/2 cup): For rolling; they give every cookie a satisfying, toasty crunch on the outside.
- Chocolate hazelnut spread (1/3 cup, such as Nutella): The crowning glory! Silky, chocolaty, and irresistible at the center of each cookie.
How to Make Chocolate Hazelnut Thumbprint Cookies
Step 1: Cream the Butter and Sugars
Start by preheating your oven to 350°F and lining a baking sheet with parchment paper. In a large bowl, cream the softened butter with both the granulated and brown sugars. Mix for several minutes until the mixture turns light and fluffy—this step ensures a soft, delicate cookie that holds its shape beautifully.
Step 2: Add Egg Yolk and Vanilla
Crack your egg and separate the yolk (save the white for another baking adventure!). Beat the egg yolk and vanilla extract into the creamed mixture until thoroughly combined. This step sets up the cookies for an irresistibly rich and tender crumb.
Step 3: Incorporate Dry Ingredients
Slowly add the flour and salt to your wet mixture, stirring just until the dough comes together. Be careful not to overmix—it’s fine if a few flour streaks remain. The dough should feel soft, not sticky, and subtly fragrant from the vanilla.
Step 4: Shape and Roll in Hazelnuts
Scoop out about 1 tablespoon of dough for each cookie and roll it gently into a ball between your hands. Next, roll each dough ball in the chopped hazelnuts, pressing lightly so the nuts stick without squishing the ball. Arrange them evenly, spacing about 2 inches apart on your prepared baking sheet.
Step 5: Make the Thumbprints
Use your thumb or the back of a small measuring spoon to create a deep but gentle indentation in the center of each dough ball. These little wells will soon cradle a dreamy swirl of chocolate hazelnut spread!
Step 6: Bake and Cool
Bake cookies for 10–12 minutes until their edges are lightly golden. If the centers have puffed up during baking, press them again gently while they’re hot. Allow the cookies to cool on the pan for 5 minutes, then transfer to a wire rack to cool completely. This is where patience pays off—the centers need to be fully cool for the next delicious step.
Step 7: Fill with Chocolate Hazelnut Spread
Once your cookies are completely cool, spoon about 1 teaspoon of chocolate hazelnut spread into each thumbprint. For a polished look, slightly warm the spread so it settles into the indentation with a picture-perfect gloss. Dive in right away or let them rest until the centers set up.
How to Serve Chocolate Hazelnut Thumbprint Cookies
Garnishes
Elevate your Chocolate Hazelnut Thumbprint Cookies with swoon-worthy garnishes! For an extra touch of bakery magic, sprinkle a few flakes of sea salt, a dusting of powdered sugar, or drizzle melted chocolate over the filled centers. These finishing touches add both elegance and an extra layer of flavor.
Side Dishes
Pair these cookies with coffee, espresso, or a cold glass of milk for a classic treat. For brunches or gatherings, they’re wonderful served alongside a fruit platter or other light pastries—the perfect sweet bite to round out any spread.
Creative Ways to Present
Display your Chocolate Hazelnut Thumbprint Cookies on a festive platter or tiered dessert stand, especially for holidays and special occasions. For gift-giving, stack them in a clear cellophane bag tied with a ribbon or pack them in a colorful tin lined with parchment—nothing says “homemade with love” quite like these irresistible bites!
Make Ahead and Storage
Storing Leftovers
Keep any leftovers at their peak by storing Chocolate Hazelnut Thumbprint Cookies in an airtight container at room temperature. They’ll stay fresh, soft, and delicious for up to 5 days, though let’s be honest—they rarely last that long!
Freezing
Want to plan ahead? You can freeze the baked cookies before filling, or freeze the dough shaped as balls. Simply thaw at room temperature, make the indentations, and continue with the recipe. For optimal results, fill with chocolate hazelnut spread after thawing so the centers stay creamy and luscious.
Reheating
If you love that just-baked warmth, gently reheat refrigerated cookies in a low oven (about 250°F) for a few minutes. Be careful not to overheat or the filling may become too runny. Let them cool slightly so the centers thicken up before serving.
FAQs
Can I use a different type Dessert
Absolutely! While hazelnuts add that classic flavor, chopped pecans, almonds, or even pistachios bring their own unique crunch and taste. Just be sure to keep the pieces small so they stick well to the dough and bake evenly.
Can I make these cookies gluten-free?
Definitely—just substitute your favorite cup-for-cup gluten-free all-purpose flour blend. Be sure the blend contains xanthan gum or add a pinch separately so the cookies hold together well. The hazelnut flavor will still shine through!
Should I refrigerate the dough before baking?
For this recipe, refrigeration isn’t usually necessary, but if your kitchen is especially warm or you want slightly thicker cookies, chill the dough for about 20 minutes. This helps the cookies keep their shape and prevents excessive spreading during baking.
Can I double the recipe for a larger crowd?
Yes, this recipe easily doubles or even triples if you’re baking for a party or packaging up gifts. Just divide the dough between batches if your mixer is on the smaller side and adjust the baking sheets so you don’t overcrowd the oven.
How should I warm the chocolate hazelnut spread for easier filling?
The easiest trick is to microwave the chocolate hazelnut spread in a small bowl for 10–15 seconds, stir, and repeat if needed until it’s slightly looser. This makes it glide right into the thumbprint centers and leaves you with a smooth, glossy finish.
Final Thoughts
Baking these Chocolate Hazelnut Thumbprint Cookies is a little act of joy that rewards you with love in every bite. I hope this recipe becomes a cherished favorite in your kitchen, shared with friends, family, or enjoyed during a quiet moment all to yourself. Give them a try—they’re guaranteed to spark smiles!
Print
Chocolate Hazelnut Thumbprint Cookies Recipe
- Total Time: 27 minutes
- Yield: 20 cookies 1x
- Diet: Vegetarian
Description
Indulge in these delightful Chocolate Hazelnut Thumbprint Cookies that are perfect for any occasion. A buttery cookie with a crunchy hazelnut coating, filled with luscious chocolate hazelnut spread.
Ingredients
- 1/2 cup unsalted butter, softened
- 1/3 cup granulated sugar
- 1/4 cup light brown sugar, packed
- 1 large egg yolk
- 1/2 teaspoon vanilla extract
- 1 cup all-purpose flour
- 1/4 teaspoon salt
- 1/2 cup finely chopped hazelnuts
- 1/3 cup chocolate hazelnut spread (such as Nutella)
Cookie Dough:
Coating and Filling:
Instructions
- Preheat the oven: Preheat the oven to 350°F and line a baking sheet with parchment paper.
- Cream butter and sugars: In a mixing bowl, cream together the softened butter, granulated sugar, and brown sugar until light and fluffy.
- Add egg and vanilla: Add the egg yolk and vanilla extract and mix until well combined.
- Mix dry ingredients: Gradually add the flour and salt, mixing just until the dough comes together.
- Shape the dough: Scoop out 1 tablespoon of dough, roll into a ball, then coat with chopped hazelnuts.
- Make indentations: Place the coated dough balls on the baking sheet and press an indentation in the center of each.
- Bake: Bake for 10–12 minutes until lightly golden, then reshape the centers if needed.
- Fill cookies: Once cooled, fill each indentation with chocolate hazelnut spread.
- Serve or store: Enjoy immediately or store in an airtight container.
Notes
- You can warm the chocolate hazelnut spread for easier filling.
- For extra indulgence, drizzle melted chocolate over the filled cookies.
- These cookies freeze well—fill them after thawing.
- Prep Time: 15 minutes
- Cook Time: 12 minutes
- Category: Dessert
- Method: Baking
- Cuisine: American-European Fusion
Nutrition
- Serving Size: 1 cookie
- Calories: 140
- Sugar: 8 g
- Sodium: 40 mg
- Fat: 8 g
- Saturated Fat: 4 g
- Unsaturated Fat: 3 g
- Trans Fat: 0 g
- Carbohydrates: 15 g
- Fiber: 1 g
- Protein: 2 g
- Cholesterol: 20 mg


