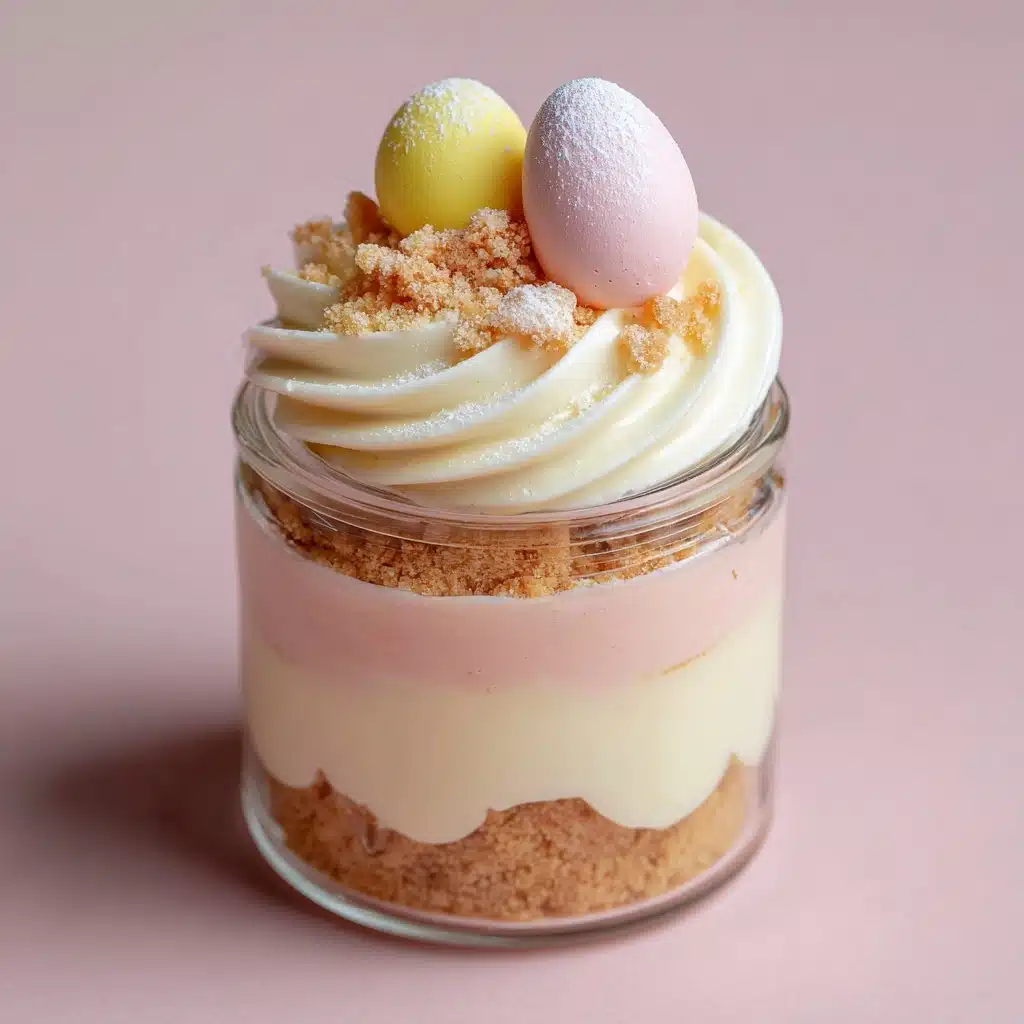
If you’re searching for a show-stopping springtime treat that’s both playfully festive and truly delicious, Easter Egg Cheesecake Jars are your ticket to dessert bliss! These adorable no-bake cheesecakes come together in cute little jars, layered with a buttery graham crust, rainbow pastel cheesecake filling, and an irresistible crown of Easter candy. Each spoonful is creamy, tangy, and packed with color and crunch, making these jars perfect for Easter brunches, egg hunts, or any occasion where you want to wow your guests (and satisfy your sweet tooth).
Ingredients You’ll Need
One of the loveliest things about Easter Egg Cheesecake Jars is how each ingredient plays a vital role—whether it’s adding flavor, lending a luscious texture, or amping up those festive pastel hues. Here’s what makes them shine:
- Graham cracker crumbs: Offer a buttery-sweet base that’s the perfect contrast to the creamy filling.
- Melted butter: Helps the crust hold its shape and infuses it with richness.
- Granulated sugar: Adds just enough sweetness and a hint of crunch to the crust.
- Cream cheese (softened): The star of that dreamy, tangy cheesecake layer—make sure it’s at room temp for easy mixing.
- Powdered sugar: Blends smoothly into the filling for a velvety, melt-in-your-mouth sweetness.
- Vanilla extract: Rounds out the flavors with classic cheesecake warmth.
- Heavy whipping cream (cold): When whipped, it brings a cloud-like lightness to the filling.
- Pastel food coloring (pink, blue, yellow, green, etc.): A little transforms your jars into Easter masterpieces—gel colors work best for bright pastels!
- Mini chocolate Easter eggs (crushed or whole): Add delightful chocolatey crunch and eye-catching color between layers or on top.
- Whipped cream and extra Easter candy for topping: Think fluffy peaks and playful extras like mini eggs or sprinkles for ultimate joy.
- 6 small jars or cups: The perfect vessel for layering and showing off each colorful creation.
How to Make Easter Egg Cheesecake Jars
Step 1: Make the Graham Crust
Start by grabbing a small bowl and mixing together your graham cracker crumbs, melted butter, and granulated sugar. Stir until everything is evenly moistened—the texture should resemble wet sand. Divide the mixture among your six jars, pressing it gently into the bottoms to create a lovely, sturdy base for the cheesecake. This simple crust is more than just a foundation; it’s a crunchy, buttery bite that anchors every spoonful.
Step 2: Prepare the Cheesecake Filling
Reach for a large bowl and beat your softened cream cheese until it’s completely smooth and free of lumps—this is crucial for a silky filling. Next, add your powdered sugar and vanilla extract, mixing until the mixture is cohesive and slightly fluffy. The aroma here is classic cheesecake heaven and sets the stage for your creamy layers ahead.
Step 3: Whip the Cream
In a separate bowl, pour in your cold heavy whipping cream. Beat it until stiff peaks form—meaning the cream stands up firmly when you lift the beaters. This not only adds air and volume to the cheesecake but also helps it set up beautifully in the jars. Take care not to overwhip, as you want a gorgeous, soft-yet-structured texture.
Step 4: Combine and Tint the Filling
Gently fold your whipped cream into the cream cheese mixture. This process should be slow and loving, so you maintain all that lovely airiness. Once combined, divide your filling among four to five small bowls, and tint each portion with a different pastel food coloring. Don’t forget—gel color goes a long way and won’t make your mixture runny. Each swirl will burst with cheerful springtime color!
Step 5: Layer the Cheesecake Jars
Time for the most fun part! Use a spoon to layer the colored cheesecake filling into your jars, alternating colors to create a rainbow or marbled effect. For extra delight, tuck some crushed or whole mini chocolate Easter eggs between your layers or simply scatter them on top of each. These pops of chocolate are like finding hidden treasures.
Step 6: Chill and Decorate
Once your jars are filled, let them chill in the refrigerator for at least two hours. This helps the cheesecake layers firm up and allows the flavors to meld. Just before serving, pipe or dollop on a swirl of whipped cream and sprinkle over extra Easter candy or mini eggs. Each jar is now a festive, ready-to-eat celebration in pastel perfection!
How to Serve Easter Egg Cheesecake Jars
Garnishes
Let your imagination run wildly festive for garnishes—these jars just beg for a little extra flair! A crown of whipped cream, a scatter of jelly beans, extra mini eggs, pastel sprinkles, or even a few sugar flowers can turn each jar into a showstopper. Serve with mini spoons for maximum cuteness (and convenience) at your holiday table.
Side Dishes
Although Easter Egg Cheesecake Jars are the star of any dessert lineup, they pair beautifully with light and fresh accompaniments. Consider a platter of fresh strawberries or sliced kiwi for a fruity counterpoint, or offer a selection of buttery shortbread cookies alongside. If you’re going all-out, a glass of sparkling lemonade or fruity iced tea rounds out the springtime vibe perfectly.
Creative Ways to Present
Taking these cheesecake jars to a party or picnic? Line them up in a basket, nestle each one into pastel napkins, or tie a ribbon around each jar for an extra festive touch. For individual Easter egg hunts, attach tiny tags with each guest’s name for a personalized surprise. And don’t forget: layering the colors at angles or swirling for a marbled look makes each jar one-of-a-kind!
Make Ahead and Storage
Storing Leftovers
If you find yourself with leftover Easter Egg Cheesecake Jars (a rare occurrence!), simply cover each jar with its lid or plastic wrap and store them in the fridge. They’ll stay fresh and dreamy for up to three days, retaining both their flavor and beautiful colors.
Freezing
While these jars are best enjoyed fresh, you can freeze them if you need to. Assemble the jars (minus whipped cream and candy toppings), wrap them tightly, and freeze for up to two weeks. Thaw overnight in the fridge before adding your final garnishes—just be mindful that the texture might be a bit softer after freezing.
Reheating
Good news: Easter Egg Cheesecake Jars are a completely no-bake treat and don’t require any reheating! Simply let them chill until ready to serve, then enjoy them cold and creamy straight from the fridge.
FAQs
Can I use store-bought whipped topping instead of whipping cream?
Absolutely! If you want a shortcut, store-bought whipped topping (like Cool Whip) works just fine. It saves time and still yields a fluffy, light texture in your cheesecake jars.
What jars work best for this recipe?
Small glass jars (like 4 ounce mason jars or Weck jars) are ideal because they beautifully showcase the pastel layers. Clear plastic cups or even stemless wine glasses are wonderful options, too!
I don’t have graham crackers—what else can I use for the crust?
You can swap in vanilla wafer crumbs, chocolate cookie crumbs, or digestive biscuits if you don’t have graham crackers handy. Each option adds its own delicious spin to your Easter Egg Cheesecake Jars.
How far in advance can I make these jars?
Feel free to whip these up a day ahead! Making them in advance allows the flavors to meld and the cheesecake to set perfectly. Just keep the jars covered in the fridge until you’re ready to serve.
Are Easter Egg Cheesecake Jars gluten free?
As written, this recipe uses graham crackers which usually contain gluten. For a gluten-free version, use certified gluten-free graham crackers or cookies for the base, and check that your candy and coloring are gluten free as well.
Final Thoughts
I can’t think of a sweeter way to celebrate spring than by sharing these cheerful, creamy Easter Egg Cheesecake Jars with the people you love! Their playful colors and decadent flavors are guaranteed to make memories at any Easter gathering or family brunch. Don’t be shy—give them a try and watch every jar disappear in a flash!
Print
Easter Egg Cheesecake Jars Recipe
- Total Time: 2 hours 25 minutes (including chilling)
- Yield: 6 jars 1x
- Diet: Non-Vegetarian
Description
Indulge in these adorable Easter Egg Cheesecake Jars, a delightful no-bake dessert that’s perfect for your holiday celebration. Layers of creamy pastel-colored cheesecake filling, crunchy graham cracker crust, and mini chocolate Easter eggs make these jars a festive and delicious treat.
Ingredients
Graham Cracker Crust:
- 1 cup graham cracker crumbs
- 3 tablespoons melted butter
- 2 tablespoons granulated sugar
Cheesecake Filling:
- 8 ounces cream cheese (softened)
- 1/2 cup powdered sugar
- 1 teaspoon vanilla extract
- 1 cup heavy whipping cream (cold)
- Pastel food coloring (pink, blue, yellow, green, etc.)
- 1/2 cup mini chocolate Easter eggs (crushed or whole)
- Whipped cream and extra Easter candy for topping
- 6 small jars or cups
Instructions
- Graham Cracker Crust: In a small bowl, mix graham cracker crumbs, melted butter, and granulated sugar until evenly combined. Divide the mixture evenly among jars and press lightly to form a crust base.
- Cheesecake Filling: In a large bowl, beat the cream cheese until smooth. Add powdered sugar and vanilla, and mix until combined. In a separate bowl, whip the heavy cream until stiff peaks form. Gently fold the whipped cream into the cream cheese mixture until light and fluffy.
- Divide the cheesecake filling evenly into 4–5 bowls and tint each with a different pastel food coloring. Layer spoonfuls of each color into the jars over the crust, creating a rainbow or marbled effect. Add crushed or whole mini Easter eggs between layers or on top.
- Refrigerate for at least 2 hours to set. Top with whipped cream and extra candy before serving.
Notes
- You can make these jars a day ahead and store covered in the fridge.
- Use gel food coloring for vibrant pastel shades without thinning the mixture.
- Prep Time: 25 minutes
- Cook Time: 0 minutes
- Category: Dessert
- Method: No-Bake
- Cuisine: American
Nutrition
- Serving Size: 1 jar
- Calories: 390
- Sugar: 24g
- Sodium: 240mg
- Fat: 28g
- Saturated Fat: 17g
- Unsaturated Fat: 10g
- Trans Fat: 0g
- Carbohydrates: 31g
- Fiber: 0g
- Protein: 4g
- Cholesterol: 85mg
