
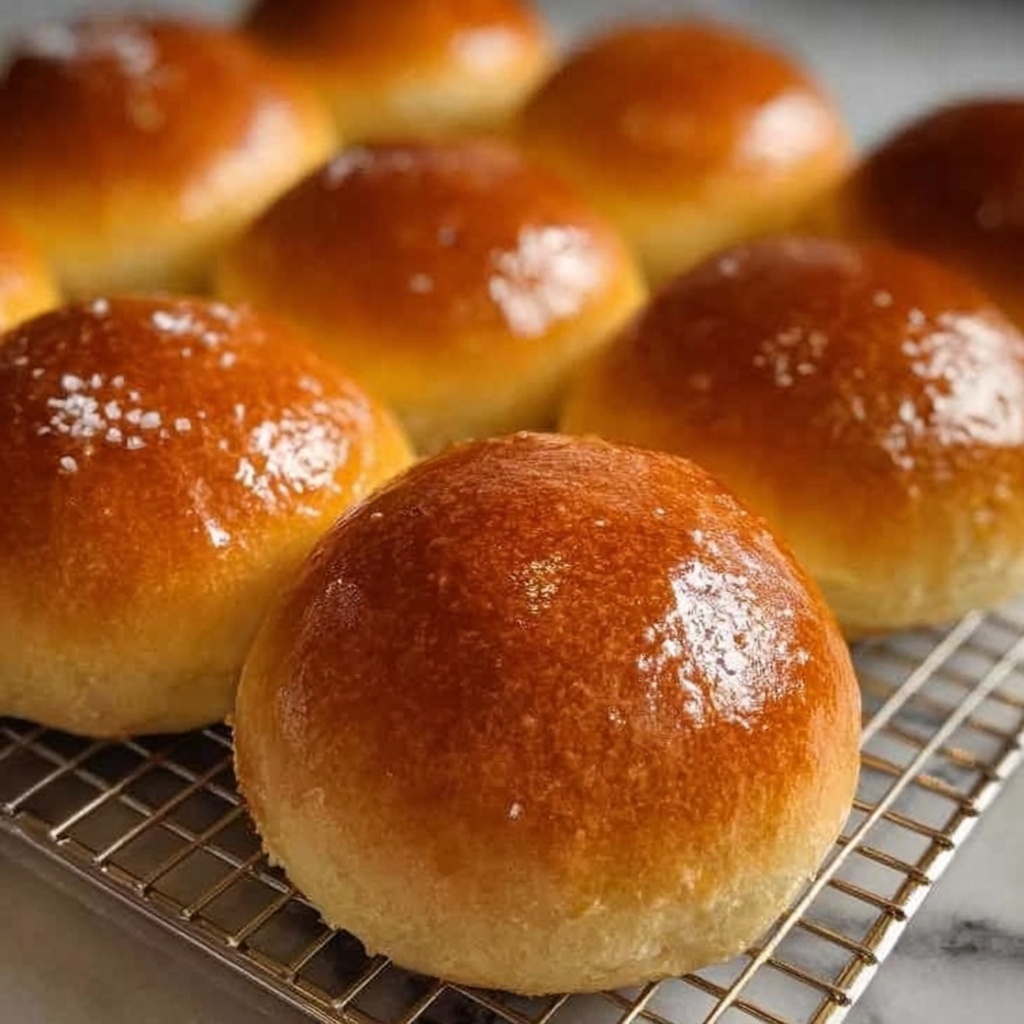
If you’ve ever dreamed of biting into a perfectly soft, buttery bun that practically melts in your mouth, then this Homemade Soft & Fluffy Brioche Buns Recipe is going to be your new best friend in the kitchen. These golden, pillowy buns boast a rich texture thanks to the generous addition of eggs and butter, giving you tender crumb and a slightly sweet flavor that’s simply irresistible. Whether you’re making sandwiches, burgers, or just enjoying them warm with a pat of butter, this recipe will elevate your baking game and bring a cozy, bakery-fresh vibe right into your home.
Ingredients You’ll Need
This Homemade Soft & Fluffy Brioche Buns Recipe calls for straightforward pantry staples, but each ingredient plays a starring role in achieving that luxurious texture and golden crust. From the creamy butter that enriches the dough to the warmth of the yeast activating the rise, every component matters.
- All-purpose flour: 500 grams (4 cups) – the foundation providing structure to your buns.
- Unsalted butter: 100 grams (7 tablespoons), softened – adds richness and tender crumb to each bite.
- Eggs: 3 large – contribute moisture, color, and that signature brioche softness.
- Milk: 250 milliliters (1 cup), warm – wakes up the yeast and hydrates the dough perfectly.
- Sugar: 50 grams (1/4 cup) – balances the richness with just the right hint of sweetness.
- Yeast: 10 grams (2 teaspoons), active dry yeast – the magical ingredient that helps your buns rise light and airy.
- Salt: 10 grams (1 teaspoon) – enhances all the flavors beautifully without overpowering.
How to Make Homemade Soft & Fluffy Brioche Buns Recipe
Step 1: Activate the Yeast
Start by sprinkling your active dry yeast over the warm milk mixed with sugar. This cozy warm bath will get the yeast bubbling and frothy within 5 to 10 minutes, signaling it’s ready to energize your dough with life and lift. It’s like giving your yeast a gentle wake-up call to get those buns nice and fluffy.
Step 2: Mix the Dough
In a large bowl, combine the flour and salt, then create a well in the middle. Pour in the yeast mixture, softened butter, and eggs. Stir everything together until a shaggy dough begins to form. This messy step is where all your ingredients start coming together into something magical.
Step 3: Knead Until Smooth and Elastic
Turn the dough out onto a floured surface and knead for about 10 minutes. This is your chance to work some muscle and really develop the dough’s gluten, which gives that perfect chewy yet tender texture you’ll love. When smooth and elastic, your dough is ready to rest.
Step 4: First Rise
Place the dough in a greased bowl and cover it up to keep the warmth in. Set it somewhere cozy to rise for 1 to 2 hours until it doubles in size. Watching it puff up like a fluffy pillow is one of the most rewarding parts of this recipe.
Step 5: Shape the Buns
Gently punch down the risen dough to release air, then divide it into eight equal pieces. Shape each piece into a smooth ball and arrange them neatly on a parchment-lined baking sheet. This step sets the stage for the buns’ perfectly round and inviting form.
Step 6: Second Rise
Cover the shaped buns and let them relax again for 30 to 45 minutes until they puff back up. This second rise is crucial for that pillowy softness and beautiful crumb you expect from classic brioche.
Step 7: Bake to Golden Perfection
Preheat your oven to 190°C (375°F). Optionally, brush the buns with beaten egg for an irresistible shiny crust. Bake them for 15 to 20 minutes until golden brown and hollow-sounding when tapped. Your kitchen will be filled with the most inviting aroma, signaling buns that are ready to enjoy.
Step 8: Cool Before Enjoying
Remove the buns from the oven and let them cool on a wire rack. Trust me, the wait is worth it as this helps them finish setting — and you get to admire those perfect homemade soft & fluffy brioche buns.
How to Serve Homemade Soft & Fluffy Brioche Buns Recipe

Garnishes
While these buns are delicious on their own, a light brush of melted butter as soon as they come out of the oven takes them to the next level, adding sparkle and extra flavor. You might also sprinkle some sesame or poppy seeds on before baking for a visually appealing twist.
Side Dishes
Pair your brioche buns with anything that deserves a soft, buttery bun. They’re fantastic alongside savory dishes like pulled pork, burgers, or fried chicken sandwiches. For a sweet journey, try them with homemade jam, honey, or Nutella for breakfast bliss.
Creative Ways to Present
Turn your brioche buns into mini sliders for parties or stack them up with colorful layers of salad and cheese for a show-stopping lunch. You can also slice and toast them lightly to make decadent French toast sandwiches, turning a simple dish into a gourmet treat.
Make Ahead and Storage
Storing Leftovers
Once fully cooled, store your brioche buns in an airtight container at room temperature. They stay fresh and soft for up to 2 days, perfect for enjoying over a couple of meals without sacrificing that delightful texture.
Freezing
For longer storage, these buns freeze wonderfully. Wrap each bun tightly in plastic wrap and place them in a freezer-safe bag. When you want a fresh bun, simply thaw them at room temperature or warm them gently in the oven for that just-baked feeling.
Reheating
Reheat your brioche buns by wrapping them in foil and warming in the oven at 150°C (300°F) for 10-15 minutes. This softens the crumb and refreshes their buttery flavor, making them taste almost as good as the day you baked them.
FAQs
Can I use instant yeast instead of active dry yeast?
Absolutely! If you’re using instant yeast, you can mix it directly with the flour without proofing in warm milk first. Just reduce the warm milk amount slightly and proceed with kneading as usual.
Is it okay to substitute whole milk with plant-based milk?
You can substitute plant-based milk like almond or oat milk, but note this might slightly affect the richness and flavor of the buns since dairy milk contributes to the traditional brioche taste and tender crumb.
Why do I need to let the dough rise twice?
The first rise allows the yeast to develop flavor and create air bubbles, while the second rise after shaping ensures your buns become light, airy, and perfectly fluffy when baked.
Can I make these buns without eggs?
Eggs are key for the signature brioche softness and golden color, but for an egg-free version, you’d need to adapt the recipe quite a bit, possibly losing some of the classic texture and richness.
How do I know when the buns are fully baked?
Besides the golden brown color, tapping the bottom of a bun should produce a hollow sound, indicating the inside is fully baked and not doughy.
Final Thoughts
There’s nothing quite like the joy of biting into warm, buttery homemade brioche buns fresh from the oven, and this Homemade Soft & Fluffy Brioche Buns Recipe is your ticket to that experience anytime you crave it. Easy enough for bakers of all skill levels and endlessly versatile in its uses, these buns will quickly become a beloved staple in your kitchen. Give yourself the gift of homemade comfort and watch everyone ask for seconds!
Print
Homemade Soft & Fluffy Brioche Buns Recipe
- Prep Time: 20 minutes
- Cook Time: 20 minutes
- Total Time: 2 hours 50 minutes
- Yield: 8 brioche buns
- Category: Bread
- Method: Baking
- Cuisine: French
Description
This classic brioche buns recipe yields soft, buttery, and fluffy buns perfect for sandwiches or burgers. Made with simple ingredients like flour, eggs, milk, butter, sugar, and yeast, these buns are enriched with buttery goodness and a slight sweetness, providing a delightful homemade bread experience.
Ingredients
Dry Ingredients
- 500 grams (4 cups) all-purpose flour
- 50 grams (1/4 cup) sugar
- 10 grams (1 teaspoon) salt
- 10 grams (2 teaspoons) active dry yeast
Wet Ingredients
- 250 milliliters (1 cup) warm milk
- 3 large eggs
- 100 grams (7 tablespoons) unsalted butter, softened
Instructions
- Activate Yeast: Mix the warm milk with sugar and sprinkle the yeast on top. Let it sit for 5-10 minutes until the mixture becomes frothy, signaling that the yeast is active.
- Combine Ingredients: In a large bowl, sift together the flour and salt. Create a well in the center, then add the activated yeast mixture, softened butter, and eggs. Mix everything until a shaggy dough forms.
- Knead Dough: Transfer the dough to a floured surface and knead it for about 10 minutes until it becomes smooth, elastic, and slightly tacky but not sticky.
- First Rise: Place the dough in a greased bowl, cover it tightly with a damp cloth or plastic wrap, and let it rise in a warm place for 1 to 2 hours, or until it has doubled in size.
- Shape Buns: Punch down the risen dough to release the air. Divide it into 8 equal pieces and shape each piece into a smooth ball. Arrange the balls on a baking sheet lined with parchment paper.
- Second Rise: Cover the shaped buns with a clean cloth and let them rise for another 30-45 minutes until they are puffed up and nearly doubled.
- Preheat Oven and Prepare for Baking: Preheat your oven to 190°C (375°F). Optionally, brush the tops of the buns with a beaten egg for a glossy, golden finish.
- Bake: Bake the buns in the preheated oven for 15-20 minutes, or until they turn golden brown and sound hollow when tapped on the bottom.
- Cool: Remove the buns from the oven and transfer them to a wire rack to cool completely before serving.
Notes
- Use warm milk (around 110°F/43°C) to properly activate the yeast without killing it.
- Allow sufficient rising time to ensure light, fluffy buns.
- For richer flavor and sheen, brush buns with egg wash before baking.
- Store leftovers in an airtight container and consume within 2 days or freeze for longer storage.
- Kneading by hand requires practice; dough should be elastic and smooth.


