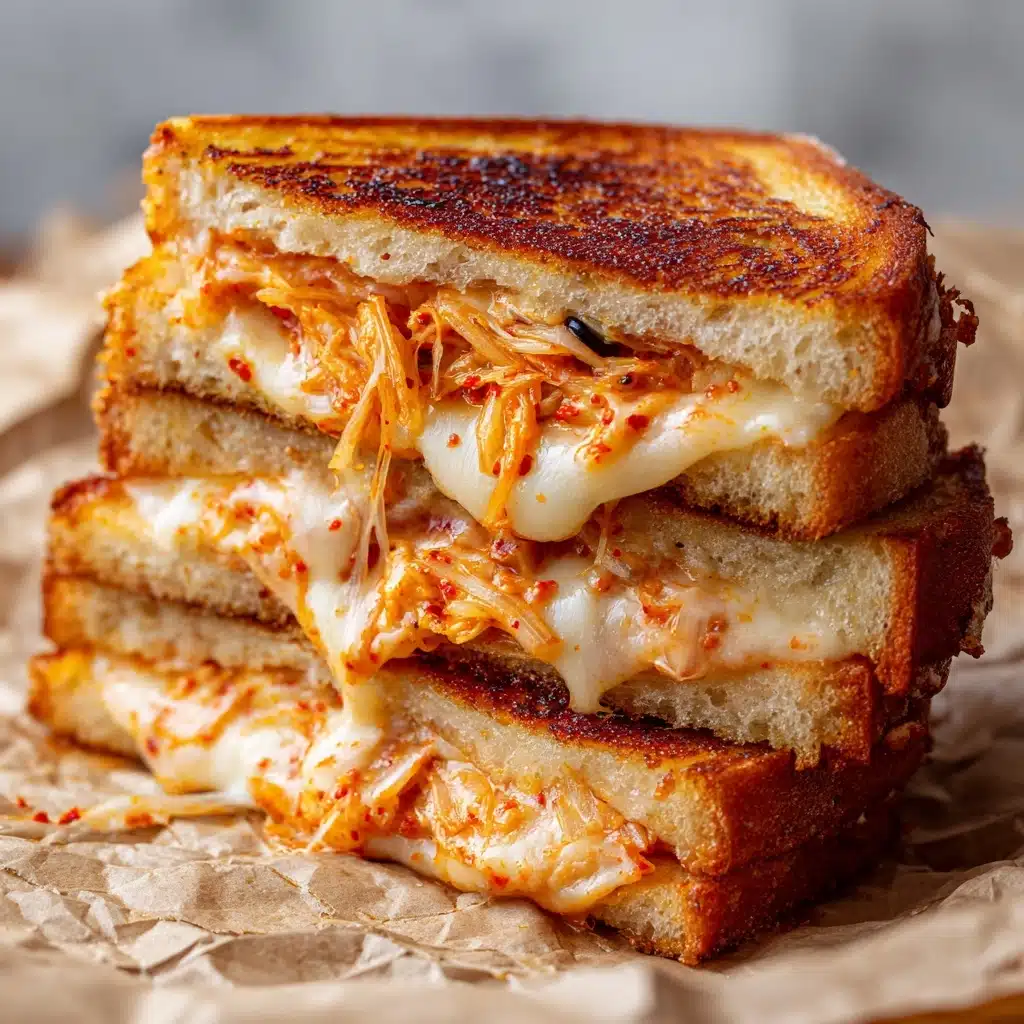
If you’re craving comfort food with a punchy twist, Kimchi Grilled Cheese is about to earn a permanent place in your kitchen lineup. Imagine melty, oozy cheese tangled with tangy, spicy kimchi, all snuggled between two slices of golden, buttery sourdough. This Korean-inspired spin on a classic grilled cheese sandwich delivers big flavors with just a handful of ingredients and comes together in twenty irresistible minutes. Whether you’re nostalgic for an after-school treat or in the mood to wow your tastebuds, this sandwich is as fun and satisfying as it sounds!

Ingredients You’ll Need
You only need a shortlist of staples to make a truly sensational Kimchi Grilled Cheese. Each one has a purpose—whether it’s adding melty texture, deepening flavor, or amping up the crunch and zing, these ingredients are all doing heavy lifting behind the scenes.
- Sourdough bread: Its chewy crumb and tangy flavor form a foundation that stands up to the toppings without getting soggy.
- Butter (softened): The secret to that beautifully crisp, golden crust baked right onto every bite.
- Shredded mozzarella cheese: For gooey stretchiness and mild flavor that lets the kimchi shine.
- Shredded sharp cheddar cheese: Adds sharp depth and a gorgeous orange color to your melt.
- Well-drained and chopped kimchi: This is the “wow” factor, bringing lively tang, spice, and crunch—make sure it’s well-drained!
- Mayonnaise (optional): For rich creaminess and to mellow the kimchi’s bite, try swirling a little into the filling.
- Gochujang (optional, for a spicy kick): If you love heat, this Korean chili paste is a game-changer in your sandwich.
How to Make Kimchi Grilled Cheese
Step 1: Prep Your Ingredients
Start by buttering one side of each slice of sourdough bread—it’s easiest to do this while the butter is nice and soft. In a separate bowl, toss together the mozzarella and sharp cheddar cheeses so they’re ready to layer. Drain your kimchi really well, give it a rough chop, and if you’re feeling adventurous, stir in a bit of mayonnaise and gochujang for extra creamy, spicy vibes.
Step 2: Build the Sandwich
Heat your skillet over medium heat—cast iron is especially fabulous for grilled cheese, but any nonstick pan will work beautifully. Place two slices of bread, buttered side down, directly onto the hot pan. Sprinkle half the cheese mixture over each slice, then spoon a generous portion of the kimchi mixture across the top. Cover with the remaining bread slices, buttered side facing up, to form two fully loaded sandwiches.
Step 3: Grill to Golden Perfection
Let each sandwich sizzle gently for 3 to 4 minutes on the first side, giving them a gentle press with your spatula to encourage maximum toastiness. Flip them carefully, then continue cooking for another 3 to 4 minutes until the bread is deeply golden and crispy, and the cheese inside has melted into a dreamy, gooey layer.
Step 4: Slice and Serve
Remove from the skillet, let the sandwiches rest for a minute (if you can wait that long!), then slice on the diagonal to show off all that cheesy, kimchi-filled glory. Serve immediately while everything is melty and delicious.
How to Serve Kimchi Grilled Cheese

Garnishes
Sometimes a little flourish takes your sandwich from tasty to stunning! Try scattering sliced green onions, toasted sesame seeds, or a pinch more gochugaru (Korean red pepper flakes) onto the plate for a restaurant-worthy look and a flavor boost.
Side Dishes
Kimchi Grilled Cheese plays well with lots of sides. Pair it with a simple tomato soup for dunking, a bright cucumber salad to cut through the richness, or crunchy pickled radishes for a Korean spin on classic pickles. Even a handful of potato chips works for that extra-crunch craving!
Creative Ways to Present
Cut the sandwiches into bite-sized squares for an unforgettable party appetizer, or serve them open-faced topped with a fried egg for a playful brunch. You can even stack mini Kimchi Grilled Cheese quarters on skewers for a whimsical, crowd-pleasing platter.
Make Ahead and Storage
Storing Leftovers
If you happen to have leftovers, wrap each cooled sandwich tightly in foil or pop it in an airtight container. They’ll keep happily in the fridge for up to two days, though their crunchy exterior is best enjoyed fresh.
Freezing
While Kimchi Grilled Cheese is at its best straight off the skillet, you can freeze extras for later. Let them cool, then wrap well in plastic and foil. For best results, freeze up to one month. When you’re ready, thaw overnight in the fridge to preserve texture.
Reheating
To reclaim that delightful crispy crunch, reheat your sandwich in a skillet over medium-low heat for a few minutes on each side, or pop it in a toaster oven. Microwave reheating is quick, but the bread will soften instead of crisping, so you’ll miss that classic grilled cheese crunch.
FAQs
Can I make Kimchi Grilled Cheese vegan?
Absolutely! Swap in your favorite vegan butter and plant-based cheeses, and be sure your kimchi doesn’t contain fish sauce or anchovy paste. The sandwich will still be packed with bold, satisfying flavor.
What type Main Course
Classic napa cabbage kimchi is perfect for Kimchi Grilled Cheese, but radish kimchi or cucumber kimchi can be fun twists. Just make sure it’s well-drained and chopped so it spreads easily and won’t make your sandwich soggy.
How can I make it even spicier?
For those who like it hot, add more gochujang, sprinkle chili flakes, or even tuck in thin slices of jalapeno along with the kimchi before grilling. You’re in charge of the heat!
Can I use a different bread?
Sourdough adds lovely tang and structure, but hearty whole wheat, rye, or even a baguette will also work. Just pick a bread sturdy enough to hold in all that glorious cheese and kimchi filling.
Is this Kimchi Grilled Cheese kid-friendly?
If your kids like a little spice and pickle, they might just adore it! For milder palates, reduce or omit the gochujang, and choose a milder kimchi to keep things friendly for every tastebud at the table.
Final Thoughts
There’s just something about the harmony of gooey cheese and zingy kimchi that makes Kimchi Grilled Cheese totally irresistible. Whether you’re new to Korean flavors or already a kimchi superfan, this recipe is an easy, cozy way to mix up your sandwich routine. Don’t wait—grab your skillet and taste the magic!
Print
Kimchi Grilled Cheese Recipe
- Total Time: 20 minutes
- Yield: 2 sandwiches 1x
- Diet: Vegetarian
Description
Indulge in the delicious fusion flavors of this Kimchi Grilled Cheese – a twist on the classic comfort food sandwich with a Korean kick.
Ingredients
Bread:
- 4 slices sourdough bread
- 1 tablespoon butter (softened)
Cheese Filling:
- 1 cup shredded mozzarella cheese
- 1/2 cup shredded sharp cheddar cheese
Kimchi Mixture:
- 1/2 cup well-drained and chopped kimchi
- 1 tablespoon mayonnaise (optional)
- 1 teaspoon gochujang (optional, for a spicy kick)
Instructions
- Prepare Bread: Butter one side of each bread slice.
- Make Cheese Filling: Mix mozzarella and cheddar cheeses in a bowl.
- Prepare Kimchi: Combine mayonnaise, gochujang, and chopped kimchi.
- Cook: Heat skillet, place bread slices buttered side down, add cheese mixture and kimchi, cover with remaining bread. Cook each side 3-4 minutes until golden and cheese melts.
- Serve: Slice and serve warm.
Notes
- Ensure kimchi is well-drained for a crispy sandwich.
- Experiment with different cheeses for varied flavors.
- Prep Time: 10 minutes
- Cook Time: 10 minutes
- Category: Main Course
- Method: Stovetop
- Cuisine: Fusion
Nutrition
- Serving Size: 1 sandwich
- Calories: 420
- Sugar: 3 g
- Sodium: 740 mg
- Fat: 26 g
- Saturated Fat: 14 g
- Unsaturated Fat: 10 g
- Trans Fat: 0 g
- Carbohydrates: 32 g
- Fiber: 2 g
- Protein: 17 g
- Cholesterol: 60 mg


