
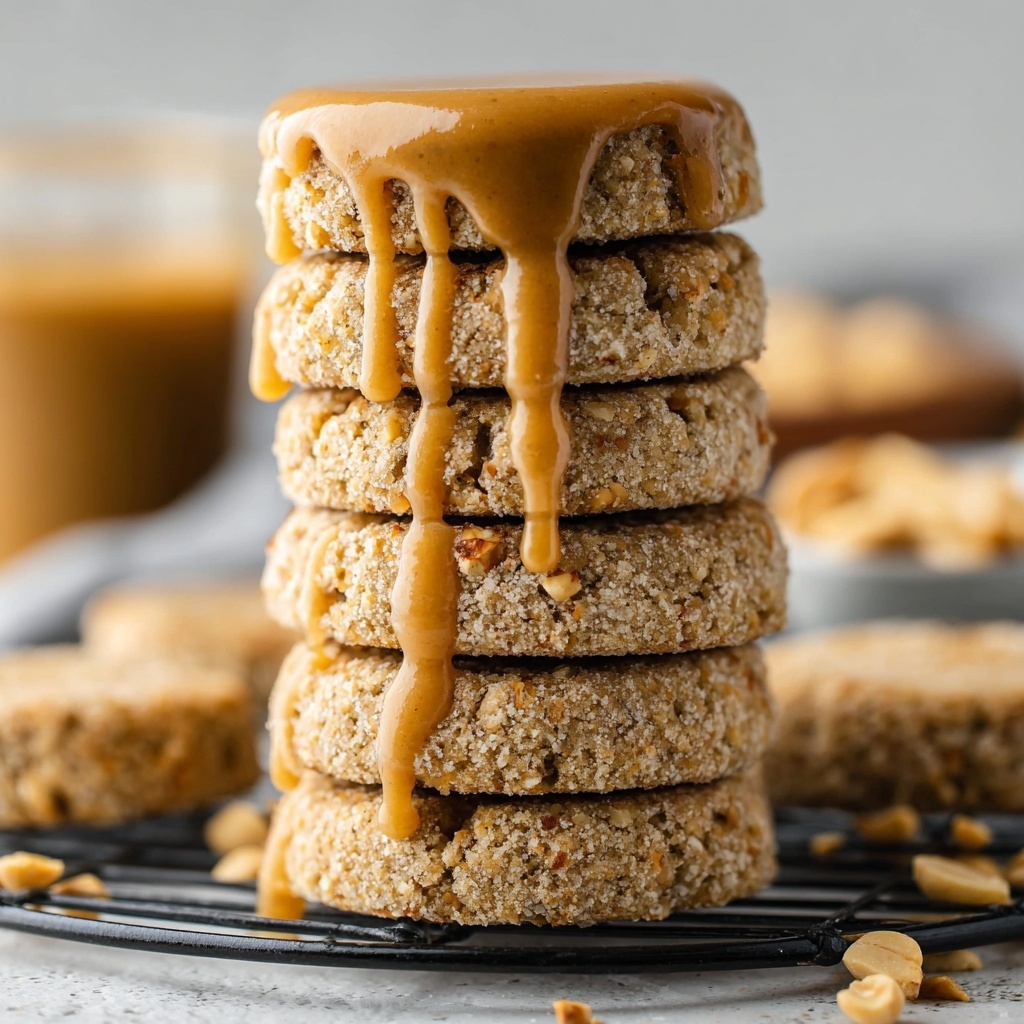
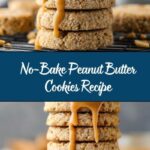
There is something truly magical about a treat that comes together without turning on the oven, and the No-Bake Peanut Butter Cookies Recipe is exactly that kind of simple pleasure. These cookies combine the rich creaminess of crunchy peanut butter with the natural sweetness of pure maple syrup, all balanced with hearty oat flour and a hint of sea salt. The result is a chewy, flavorful cookie with a delightful texture that’s perfect for when you want a quick, satisfying snack or dessert without any fuss. I absolutely love how easy this recipe is to make, yet how deeply comforting and delicious every bite turns out.
Ingredients You’ll Need
Gathering a handful of everyday ingredients is all it takes to whip up this wonderful batch of No-Bake Peanut Butter Cookies Recipe. Each component plays a key role in making these cookies taste incredible while keeping the texture just right.
- Crunchy peanut butter: The star ingredient that adds both richness and delightful nutty texture.
- Pure maple syrup: A natural sweetener that brings smooth sweetness and helps bind the dough together.
- Oat flour: Provides the structure and a lovely wholesome base, plus it keeps the cookies gluten-free if you use certified oat flour.
- Sea salt: Just a teaspoon brightens the flavors and balances the sweetness beautifully—don’t skip it.
How to Make No-Bake Peanut Butter Cookies Recipe
Step 1: Combine Your Wet Ingredients
Start by adding the crunchy peanut butter and pure maple syrup to a large mixing bowl. Whisk them together until they form a smooth, glossy mixture. This is where the magic begins—these ingredients create the creamy, sweet base that makes the cookies so addictive.
Step 2: Add the Dry Ingredients in Stages
Sprinkle in your sea salt, then slowly add the oat flour in two or three increments. Mixing as you go helps to evenly distribute the flour without creating lumps. Use a spatula or spoon to fold everything together until it comes together into a dough that’s soft but holds its shape.
Step 3: Shape the Dough
Now, get your hands a bit messy and knead the dough gently to ensure everything is well combined. Place the ball of dough between two sheets of parchment paper and roll it out to about half an inch thick. Then, grab a 2-inch cookie cutter—or any size you prefer—and start cutting out your cookie shapes. Each cookie promises that perfect bite of peanut buttery goodness.
Step 4: Chill and Finish
Arrange your cookie shapes on a baking sheet lined with parchment paper, and for extra flair, press down gently with a fork to create a simple waffle-like pattern. Pop them in the fridge for at least an hour so they can firm up and develop their chewy texture. Then, you’re ready to enjoy pure peanut butter bliss.
How to Serve No-Bake Peanut Butter Cookies Recipe

Garnishes
While these cookies are amazing on their own, consider sprinkling a little extra sea salt on top before chilling for a salty-sweet finish. You can also drizzle melted chocolate or add mini chocolate chips for an irresistible touch that really impresses guests.
Side Dishes
These cookies pair beautifully with a cold glass of milk, a creamy latte, or even a cup of herbal tea. Their sweet, nutty depth complements warm or chilled beverages perfectly and makes any snack time feel special.
Creative Ways to Present
If you’re taking these cookies to a party, arrange them on a colorful platter with fresh berries or sliced bananas for an inviting look. They also make great edible gifts—stacked with parchment paper in a pretty box, tied with twine, and labeled with your favorite recipe name.
Make Ahead and Storage
Storing Leftovers
Once your cookies have set, keep them fresh by storing in an airtight container in the refrigerator. They stay delightfully chewy and tasty for up to two weeks, making them a convenient treat to enjoy whenever you need a quick energy boost.
Freezing
If you want to make these ahead of time or save some for later, you can freeze the cookies in a sealed container. When you’re ready to enjoy, just defrost them overnight in the fridge. They thaw well without losing their lovely texture or flavor.
Reheating
No need to warm these up, but if you prefer your cookies a bit softer, leave them at room temperature for 10 minutes or so. They soften slightly, giving a more tender bite while maintaining their structure perfectly.
FAQs
Can I use smooth peanut butter instead of crunchy?
Absolutely! Smooth peanut butter will give you a creamier texture with less crunch, so it’s all about your preference. Using crunchy peanut butter adds those delightful nutty bits that some people really love in their cookies.
Is it okay to substitute maple syrup with honey?
Yes, honey can work as a substitute if you don’t have maple syrup on hand. It will impart a slightly different flavor profile but still provide sweetness and moisture needed to bind the dough.
Can I make these cookies vegan?
Definitely! Since the recipe is naturally vegan with peanut butter, maple syrup, oat flour, and salt, just be sure your peanut butter and oat flour are certified vegan if you want to be extra sure.
Will the cookies hold together without refrigeration?
Refrigerating is key to helping the cookies firm up. Without chilling, they’ll be too soft and might fall apart. So, plan to refrigerate for at least an hour before serving for the best texture.
How do I make oat flour at home?
It’s super simple – just blitz rolled oats in a food processor or high-speed blender until they turn into a fine flour. This is a great way to make sure your oat flour is fresh and perfect for this recipe.
Final Thoughts
The No-Bake Peanut Butter Cookies Recipe is truly a winner for anyone looking to make a quick, wholesome, and irresistibly tasty treat. It’s perfect for busy days, last-minute dessert needs, or whenever you crave something comforting and homemade without heating up the kitchen. I encourage you to give this recipe a try—you’ll love how easy and rewarding these cookies are to make!
Print
No-Bake Peanut Butter Cookies Recipe
- Prep Time: 15 minutes
- Cook Time: 0 minutes
- Total Time: 1 hour 15 minutes
- Yield: 24 servings
- Category: Dessert
- Method: No-Cook
- Cuisine: American
- Diet: Gluten Free
Description
These No-Bake Peanut Butter Cookies are a quick and easy treat that require no oven time. Made with crunchy peanut butter, pure maple syrup, and oat flour, they are naturally sweetened and gluten-free when using gluten-free oat flour. The cookies are rolled out and chilled to set, offering a deliciously chewy texture with a hint of saltiness. Perfect for a healthy snack or dessert, these cookies can be stored in the fridge or freezer.
Ingredients
Ingredients
- 250 g crunchy peanut butter
- 200 ml pure maple syrup
- 300 g oat flour (use gluten-free oat flour if needed)
- 1 teaspoon sea salt (optional but recommended)
Instructions
- Combine Ingredients: To a large mixing bowl, add the crunchy peanut butter and pure maple syrup. Whisk the mixture thoroughly until the ingredients are well blended. Add the sea salt if using, then gradually add the oat flour in 2 to 3 increments, mixing each addition with a spatula or spoon until a dough forms.
- Knead and Roll Dough: Using clean hands, knead the mixture in the bowl to ensure everything is evenly incorporated into a cohesive dough ball. Place the dough onto a sheet of parchment paper and use a rolling pin to flatten it evenly to approximately ½ inch (1.25 cm) thick. Use a 2-inch (5 cm) cookie cutter to cut out cookies, or a larger cutter if you prefer fewer but bigger cookies.
- Shape and Chill: Transfer the cut cookies onto another baking sheet lined with parchment paper. Optionally, press down on each cookie gently with a fork to create a waffle pattern surface. Place the baking sheet in the refrigerator and chill the cookies for at least 1 hour to firm up before serving.
- Storage: Once set, store the cookies in an airtight container in the refrigerator where they will keep fresh for up to 2 weeks. For longer storage, freeze the cookies in an airtight container and defrost them overnight in the refrigerator before serving.
Notes
- Use gluten-free oat flour if you need the cookies to be gluten-free.
- Sea salt enhances the flavor but can be omitted if preferred.
- These cookies do not require baking, making them great for hot weather or quick prep.
- If the dough is too sticky, chill it briefly before rolling out to make handling easier.
- Store refrigerated or frozen to maintain freshness and texture.
