Get ready to fall in love with Snow Skin Mooncakes, the silky, no-bake mooncakes that truly steal the spotlight at any Mid-Autumn Festival celebration. These mesmerizing treats feature a wonderfully soft, chewy “snow skin” shell made from glutinous rice flour, delicately wrapped around a creamy, fragrant lotus seed or red bean paste center. With vibrant colors and stunning molded designs, Snow Skin Mooncakes not only enchant the eyes but also melt in your mouth. Once you discover how approachable and fun they are to make at home, you might just find yourself making them for friends and family year-round!

Ingredients You’ll Need
The beauty of Snow Skin Mooncakes is how a handful of simple ingredients magically transform into elegantly crafted sweets. Each one plays a role—providing the pillowy texture, just-right sweetness, velvety color, or classic flavor that make these treats so beloved.
- Glutinous Rice Flour: This is the soul of the snow skin, giving it that irresistibly chewy and tender bite.
- Rice Flour: Lightens the texture of the dough so it doesn’t get too dense or sticky.
- Wheat Starch: Makes the skin extra smooth, supple, and almost translucent—don’t skip this if you want authentic results!
- Powdered Sugar: Dissolves easily and ensures the dough is evenly sweet, not gritty.
- Milk: Contributes richness and binds the dough for a silky finish.
- Sweetened Condensed Milk: Adds a subtle, luxurious creaminess and deepens the flavor.
- Vegetable Oil: Keeps the snow skin moist, soft, and pliable so it doesn’t crack when shaping.
- Lotus Seed Paste or Red Bean Paste (Filling): The heart of every mooncake—choose your favorite or try both!
- Food Coloring or Natural Powders (Optional): For a multi-colored wow factor, try matcha, beetroot, or butterfly pea flower powder.
- Cornstarch (for Dusting): Prevents sticking and ensures a perfectly smooth mooncake surface.
How to Make Snow Skin Mooncakes
Step 1: Sift and Mix Your Flours
Start by sifting together the glutinous rice flour, rice flour, wheat starch, and powdered sugar into a large mixing bowl. This little act ensures your snow skin is lump-free and beautifully fine. A few extra seconds with the sifter here goes a long way toward that melt-in-your-mouth texture!
Step 2: Add the Liquids
Pour in the milk, sweetened condensed milk, and vegetable oil. Whisk everything together until smooth and creamy with absolutely no lumps. The condensed milk works its magic to give the dough flavor and a lovely, soft crumb. If you plan to color your dough, this is the moment to blend in your preferred food coloring or natural powders for a vibrant touch.
Step 3: Steam the Dough
Strain the mixture into a heatproof bowl to guarantee an ultra-silky base. Cover the bowl tightly with plastic wrap and steam over medium-high heat for about 25 minutes. Watch for the dough to transform from gooey to opaque and fully cooked through. This is when your kitchen starts to smell heavenly!
Step 4: Knead Until Silky Smooth
Once the dough is cool enough to handle, dust a clean surface generously with cornstarch. Knead the dough just until it’s soft, smooth, and supple like the finest playdough. If a little sticky, add more dusting cornstarch, but take care—the goal is pillowy softness, not dryness.
Step 5: Portion and Fill
Divide both the dough and filling into equal portions—about 25 grams of dough to 20 grams of filling per mooncake is perfect. Flatten a dough ball, place your chosen filling in the center, and gently wrap and pinch to seal. Roll each mooncake into a ball for the mold.
Step 6: Press and Shape
Dust a mooncake mold with cornstarch, then press each filled ball gently into the mold. Give it a quick, gentle press to set the classic floral pattern. Carefully unmold and set each mooncake aside, marveling at your handiwork as you go!
Step 7: Chill and Serve
Place all your finished Snow Skin Mooncakes in an airtight container and chill them for at least 2 hours. This step sets the texture and enhances flavor. The hardest part might just be waiting, but trust me—chilled mooncakes are at their very best!
How to Serve Snow Skin Mooncakes

Garnishes
For a festive finishing touch, dust your mooncakes very lightly with extra cornstarch, or sprinkle them with edible gold leaf for a touch of luxury. Tiny petals or dried flowers on the serving platter can captivate guests before they’ve even taken a bite.
Side Dishes
These delicate treats shine alongside hot jasmine tea or a light oolong. The balance of the subtly sweet Snow Skin Mooncakes with aromatic tea is timeless. You might also enjoy them with chilled fresh fruits or a platter of savory snacks to balance out the sweetness.
Creative Ways to Present
For show-stopping style, serve Snow Skin Mooncakes on a wooden board or elegant cake stand, letting the molded patterns take center stage. Try making a rainbow batch using different natural powders, or arrange them in cute boxes as edible gifts—a gesture sure to delight friends and family.
Make Ahead and Storage
Storing Leftovers
Snow Skin Mooncakes are at their best chilled and can be stored in an airtight container in the refrigerator for up to 5 days. Be sure to separate layers with parchment to keep them pristine and picture-perfect.
Freezing
If you love planning ahead or want to save mooncakes for later, freezing is a fantastic option. Wrap each mooncake well in plastic wrap and then seal them in a freezer-safe container. They’ll keep beautifully for up to a month—just thaw in the fridge overnight for best texture.
Reheating
While Snow Skin Mooncakes are meant to be enjoyed cold for their signature chewy texture, if you ever want them just slightly softer, let them rest at room temperature for 10 to 15 minutes before serving. Skip the microwave—it can make the skin rubbery.
FAQs
Can I make Snow Skin Mooncakes without a mold?
Yes! While the classic look comes from traditional mooncake molds, you can simply roll your filled dough balls by hand and gently flatten them for a more rustic, homemade charm. Or use any small food-safe mold with interesting patterns for a unique spin.
What other fillings can I try?
Don’t limit yourself to lotus seed or red bean paste—experiment with chocolate ganache, matcha white bean, black sesame, or fruit-based fillings like mango or strawberry jam. Each adds a delightful new flavor to the classic Snow Skin Mooncake shell.
How do I prevent my dough from sticking?
Cornstarch is your friend! Dust both your hands, tools, and work surface liberally. If you find the dough sticking, add a touch more cornstarch as you knead or shape, but avoid overdoing it to keep the skin tender.
Can I make Snow Skin Mooncakes vegan?
Absolutely! Swap out regular milk and condensed milk for your favorite non-dairy alternatives, and ensure your filling doesn’t contain any animal products. The results will still be beautifully soft and delicious.
How do I get vibrant colors in my mooncakes?
Food coloring certainly works, but for a natural approach, mix in powders like matcha (green), beetroot (pink), or butterfly pea flower (blue) directly into the dough. These not only look stunning but also add subtle, complementary flavors.
Final Thoughts
Once you experience the fun and satisfaction of crafting homemade Snow Skin Mooncakes, you’ll understand why they’re the highlight of festive gatherings and special occasions. Gather your supplies, invite a friend to join, and enjoy both the process and each luscious, beautiful bite. Happy mooncake making!
Print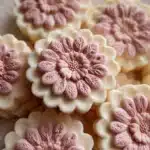
Snow Skin Mooncakes Recipe
- Total Time: 1 hour 10 minutes
- Yield: 10–12 mooncakes 1x
- Diet: Vegetarian
Description
Learn how to make delicious Snow Skin Mooncakes at home with this easy recipe. These no-bake mooncakes are a delightful Asian dessert perfect for celebrating the Mid-Autumn Festival.
Ingredients
Dough:
- 100 g glutinous rice flour
- 100 g rice flour
- 30 g wheat starch
- 80 g powdered sugar
- 250 ml milk
- 30 g sweetened condensed milk
- 30 g vegetable oil
Filling:
- 200 g lotus seed paste or red bean paste
Additional:
- Food coloring or natural powders (optional)
- Cornstarch (for dusting)
Instructions
- Mix Dry Ingredients: In a large mixing bowl, sift together the glutinous rice flour, rice flour, wheat starch, and powdered sugar.
- Add Wet Ingredients: Mix in the milk, condensed milk, and vegetable oil until smooth. Strain the mixture for a silky texture.
- Steam the Dough: Steam the mixture until fully cooked and opaque. Knead the dough until smooth.
- Prepare Mooncakes: Divide the dough and filling, wrap the filling with the dough, and shape into mooncakes.
- Chill: Chill the mooncakes for at least 2 hours before serving.
Notes
- Store in the refrigerator for up to 5 days.
- Experiment with flavored fillings like matcha, chocolate, or fruit pastes.
- Add natural powders like beetroot, matcha, or butterfly pea flower for colorful dough.
- Prep Time: 45 minutes
- Cook Time: 25 minutes
- Category: Dessert
- Method: Steaming
- Cuisine: Chinese
Nutrition
- Serving Size: 1 mooncake
- Calories: 180
- Sugar: 14 g
- Sodium: 25 mg
- Fat: 6 g
- Saturated Fat: 1 g
- Unsaturated Fat: 4.5 g
- Trans Fat: 0 g
- Carbohydrates: 28 g
- Fiber: 1 g
- Protein: 2 g
- Cholesterol: 2 mg
